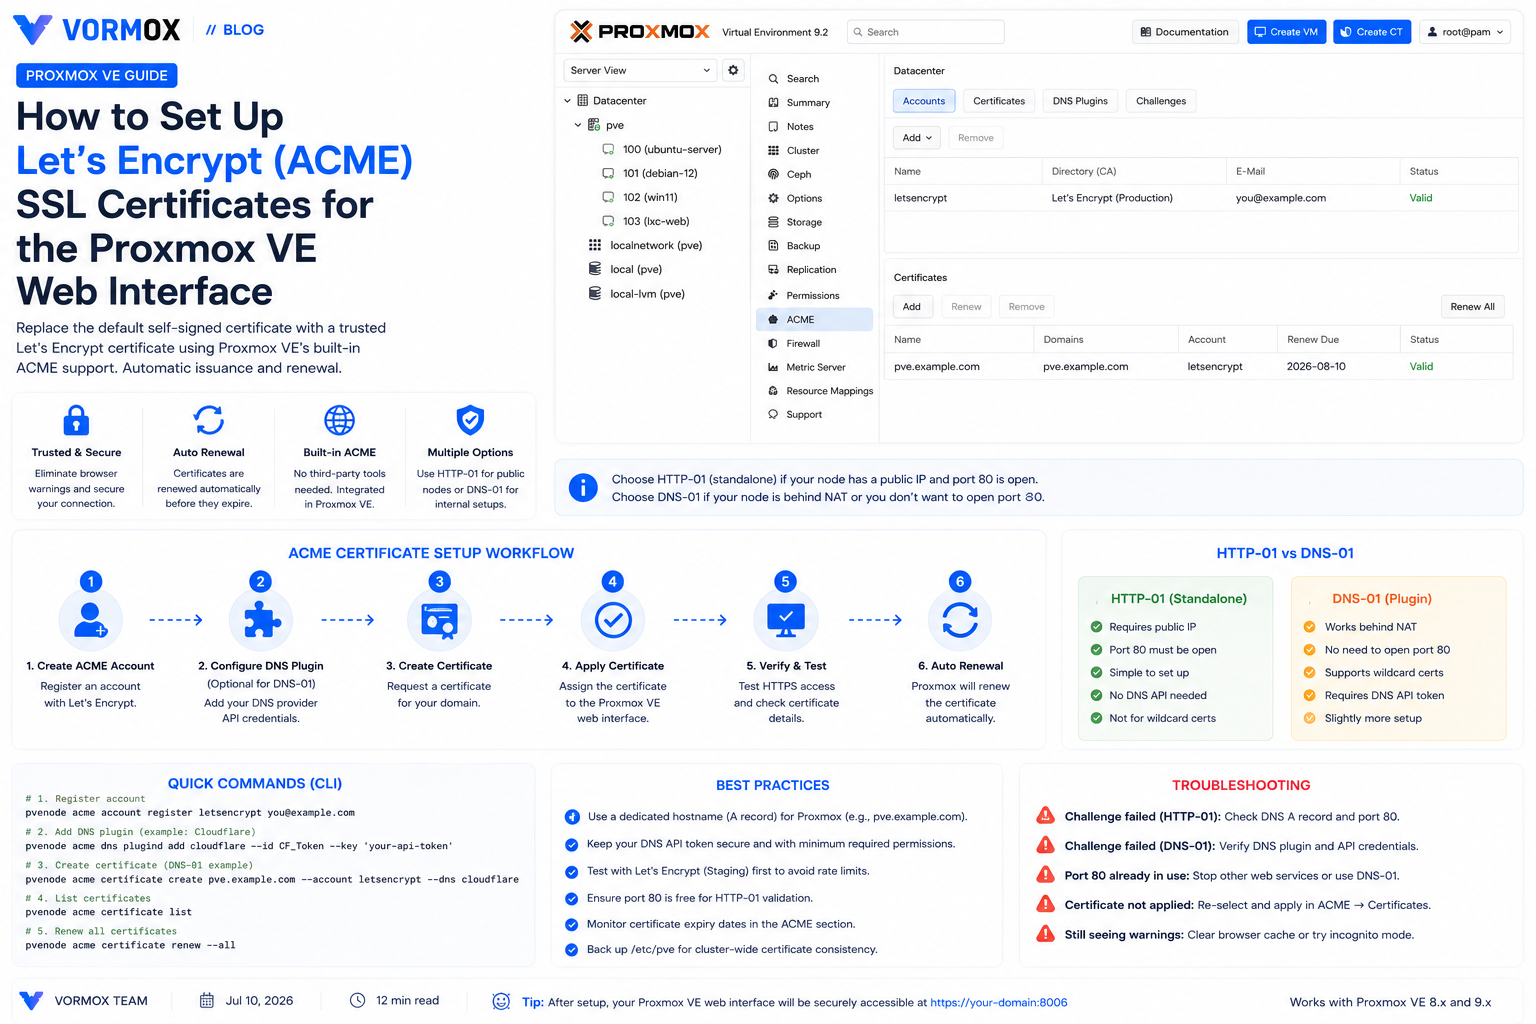
By default, every Proxmox VE node ships with a self-signed SSL certificate for its web interface and API. It works, but it also means every browser tab you open to https://your-node:8006 greets you with a security warning, and any automation, monitoring agent, or API client that talks to Proxmox has to be configured to ignore certificate errors — which is a bad habit to build into scripts that might touch production infrastructure. Proxmox VE has built-in support for the ACME protocol, the same one Let's Encrypt uses, so you can issue and auto-renew a trusted certificate without any third-party tools or cron jobs.
This guide walks through configuring ACME certificates on Proxmox VE 9.x, covering both the HTTP-01 challenge (for nodes reachable on the public internet) and the DNS-01 challenge (for homelabs and internal networks sitting behind NAT or a firewall), plus how renewal and multi-node clusters work.
Why bother with a real certificate?
- No more "Your connection is not private" warnings when you or your team log into the web UI.
- API clients and Terraform/Ansible providers can talk to Proxmox without disabling TLS verification.
- Automatic renewal — once configured, Proxmox handles renewal itself; you never touch it again.
- No extra software — ACME support is built into
pveproxyand thepvenodeCLI, unlike a typical Certbot setup on other Linux distributions.
Prerequisites
- A Proxmox VE 8.x or 9.x host with admin (root or a user with
Sys.Modifyon/) access to the web UI. - A registered domain name you control the DNS for (e.g.
pve.example.com). - Either:
- Port 80 reachable from the internet on the node (for HTTP-01), or
- API access to your DNS provider (Cloudflare, Route53, DigitalOcean, etc.) for DNS-01.
How ACME works in Proxmox VE
Proxmox VE implements the ACME protocol directly — the same protocol Let's Encrypt, ZeroSSL, and other CAs use to automatically verify domain ownership and issue certificates. There are two ways Proxmox can prove you control a domain:
HTTP-01 (standalone) challenge
Proxmox VE always has an implicit "standalone" plugin available. When you order a certificate, pveproxy briefly spawns a listener on port 80 to answer the CA's validation request. This requires:
- The domain's DNS A/AAAA record pointing at the node's public IP.
- Port 80 open and unused by anything else (no reverse proxy already bound to it) during validation.
This is the simplest option if your Proxmox node has a public IP and no other web server on port 80.
DNS-01 challenge
If your node is behind NAT, on a private network, or you don't want to expose port 80 at all, DNS-01 is the better fit. Proxmox reuses the plugin library from acme.sh, so it supports dozens of DNS providers (Cloudflare, Route53, DigitalOcean, OVH, Hetzner, etc.). The CA asks Proxmox to publish a specific TXT record at _acme-challenge.yourdomain.com, and once Proxmox creates it via your provider's API, the CA verifies it and issues the cert — no inbound ports required at all.
HTTP-01 vs. DNS-01: which should you use?
| Factor | HTTP-01 (standalone) | DNS-01 (plugin) |
|---|---|---|
| Requires public IP + open port 80 | Yes | No |
| Works behind NAT / firewalled homelab | No | Yes |
| Setup complexity | Low — nothing to configure beyond DNS A record | Medium — needs a DNS provider API token |
| Supports wildcard domains | No | Yes |
| Fails if another service owns port 80 | Yes | No |
| Renewal dependency | Domain must keep resolving to this node | DNS API token must stay valid |
If your Proxmox node sits directly on the internet with nothing else listening on port 80, HTTP-01 is the fastest path — there's genuinely nothing to configure beyond pointing DNS at the node. If the node is internal, sits behind a NAT gateway, or you'd rather not expose port 80 at all (a very reasonable stance for a hypervisor's management interface), spend the extra five minutes on a DNS-01 plugin. It's also the only option if you want a wildcard certificate.
Step 1: Register an ACME account
An ACME account is what Let's Encrypt (or another CA) associates your certificate orders with. You only need to do this once per Proxmox cluster.
Using the web interface
- Log into the Proxmox VE web UI.
- Go to Datacenter → ACME.
- Click Add under Accounts.
- Choose an endpoint — Let's Encrypt V2 for production certificates, or the Let's Encrypt V2 Staging endpoint while you're testing (staging certs aren't trusted by browsers but don't count against Let's Encrypt's production rate limits).
- Enter a contact email address (used for expiry/problem notifications) and accept the Terms of Service.
- Click Register.
Using the CLI
pvenode acme account register default you@example.comReplace default with whatever account name you like and follow the prompts to select an endpoint and accept the ToS. You can list registered accounts at any time with:
pvenode acme account listStep 2: Configure a DNS plugin (DNS-01 only)
Skip this step if you're using the HTTP-01 standalone challenge.
- In the web UI, go to Datacenter → ACME and open the Challenge Plugins tab.
- Click Add and select your DNS provider from the dropdown.
- Fill in the required API credentials. For Cloudflare, for example, you'd generate a scoped API token (Zone → DNS → Edit, restricted to the specific zone) from the Cloudflare dashboard and paste it in as
CF_Token. - Set a validation delay if your provider is slow to propagate DNS changes (10–30 seconds is usually enough; some providers may need longer).
Equivalent CLI example for Cloudflare:
pvenode acme plugin add dns cf-plugin --api cf --data 'CF_Token=your_scoped_api_token'Homelab tip: alias mode for split-horizon DNS
If your Proxmox node's public-facing domain is managed by a registrar or DNS host that doesn't have an ACME plugin (or you don't want to hand it API credentials), you can delegate just the validation record. Create a CNAME on your real domain:
_acme-challenge.pve.example.com CNAME _acme-challenge.pve.example.net.Then configure the ACME domain in Proxmox with an "Alias" pointing to pve.example.net, a zone you do control via an API-enabled DNS provider. Proxmox will publish the TXT record on the alias domain, and the CNAME makes it resolve correctly for validation.
Step 3: Add the domain to the node
- Go to node name → Certificates (not Datacenter — this step is per node).
- Open the ACME tab and click Add.
- Enter the fully qualified domain name for this node (e.g.
pve1.example.com). - Pick the challenge type: standalone for HTTP-01, or the plugin you configured in Step 2 for DNS-01.
- Select the ACME account you registered in Step 1.
If you have a cluster, repeat this for every node — each node's certificate is independent and tied to its own domain name (e.g. pve1.example.com, pve2.example.com). A single certificate is not automatically shared across nodes, though you can add multiple Subject Alternative Names to one domain entry if you want a single cert to cover several hostnames.
Step 4: Order the certificate
Back on the same Certificates page, click Order Certificates Now. Proxmox will:
- Contact the ACME account's CA and request an order for the configured domain(s).
- Complete the HTTP-01 or DNS-01 challenge automatically.
- Download and install the issued certificate, restarting
pveproxyto pick it up.
From the CLI, the equivalent is:
pvenode acme cert orderWatch the task log in the web UI (or terminal output from the CLI command) — it shows each step of the ACME handshake, which is the fastest way to spot a misconfigured plugin or an unreachable port 80.
Step 5: Verify it worked
Reload the web UI in your browser — you should see a padlock with no warnings. From the command line you can confirm the issuer directly:
echo | openssl s_client -connect pve1.example.com:8006 2>/dev/null | openssl x509 -noout -issuer -datesYou're looking for an issuer line referencing Let's Encrypt (or your chosen CA) instead of "Proxmox Virtual Environment" (the self-signed default), plus a notAfter date roughly 90 days out.
Automatic renewal
Once a domain is configured with ACME, Proxmox handles renewal for you — no cron job, no Certbot timer. The pve-daily-update.service checks certificate expiry as part of its daily run and automatically re-orders any certificate that's within 30 days of expiring, repeating the same challenge that issued it originally. As long as the DNS plugin credentials stay valid (API tokens don't expire or get revoked) or port 80 remains reachable, you should never have to manually renew a Proxmox-managed certificate.
You can double check the timer is active:
systemctl status pve-daily-update.timerMulti-node cluster considerations
- Per-node domains: each node needs its own DNS entry (A/AAAA record) and its own ACME domain configuration under that node's Certificates page. There's no cluster-wide "one cert for everyone" toggle.
- Wildcard certificates: DNS-01 supports wildcard domains (e.g.
*.pve.example.com), which is convenient if you'd rather issue one wildcard cert and reuse it — though Proxmox's per-node ACME workflow still issues separately per node unless you script around it with the API. - Cluster CA and pveproxy certs are different things: the internal cluster certificate (
pve-root-ca.pem) used for inter-node communication is separate from the pveproxy web/API certificate you're replacing here. Never touch the cluster CA files — ACME only manages the user-facing web certificate.
Using a custom or externally-issued certificate instead
If your organization already has its own CA or purchases certificates from a commercial provider rather than using ACME, you can upload a certificate manually instead of using the ACME flow:
- Go to node name → Certificates → Certificates tab (not ACME).
- Click Upload Custom Certificate.
- Paste in the certificate chain and the unencrypted private key.
Proxmox stores these as /etc/pve/local/pveproxy-ssl.pem and /etc/pve/local/pveproxy-ssl.key. Unlike ACME-managed certificates, custom uploads are not renewed automatically — you're responsible for re-uploading before expiry.
Scripting it across a large cluster
Clicking through the web UI for two or three nodes is fine, but if you're managing a ten-plus node cluster, it's faster to drive the same workflow through pvesh (Proxmox's built-in API shell) or plain pvenode commands over SSH. A simple loop from a management host with SSH access to every node might look like:
for node in pve1 pve2 pve3 pve4; do
  ssh root@"$node" "pvenode config set --acme domains=${node}.example.com,account=default"
  ssh root@"$node" "pvenode acme cert order"
done
For DNS-01 plugins, register the plugin once via pvenode acme plugin add on any node — plugin configuration is stored cluster-wide in /etc/pve, so every node can reference the same plugin without re-entering API credentials. Only the domain-to-node assignment and the actual certificate order are per node.
Checking certificate status via the API
Rather than eyeballing the web UI, you can pull certificate metadata straight from the API — handy for a monitoring check or a pre-flight script before a maintenance window:
pvesh get /nodes/pve1/certificates/infoThis returns the certificate's subject, issuer, and notafter timestamp as JSON, which you can feed into a monitoring system (Zabbix, Checkmk, a simple cron script piping to your alerting of choice) to get a heads-up if a certificate is ever more than, say, 10 days from expiry with no successful renewal in the logs — a useful safety net on top of Proxmox's own automatic renewal.
Hardening the web interface after installing a trusted certificate
A trusted certificate fixes the "invalid certificate" warning, but it's a good moment to also tighten the TLS configuration itself. Proxmox VE's pveproxy reads TLS settings from /etc/default/pveproxy. To disable older protocol versions and weak ciphers, add or edit:
CIPHERS="EECDH+AESGCM:EDH+AESGCM"
CIPHERSUITES="TLS_AES_256_GCM_SHA384:TLS_CHACHA20_POLY1305_SHA256:TLS_AES_128_GCM_SHA256"
Then restart the proxy for the change to take effect:
systemctl restart pveproxyRun the node through an external TLS scanner (Qualys SSL Labs, or testssl.sh if you'd rather not send an internal hostname to a third-party service) afterward to confirm no unexpectedly weak ciphers remain enabled.
Troubleshooting
"Challenge failed" on HTTP-01
Almost always one of: the domain doesn't actually resolve to this node's public IP, port 80 is blocked by an upstream firewall/router, or something else (a reverse proxy, another web server) is already bound to port 80 on the host, leaving nothing available for the standalone validation listener.
"DNS record not found" or timeout on DNS-01
Usually DNS propagation delay — increase the plugin's validation delay setting. Also double-check the API token has permission to edit the specific zone, and that you didn't typo the zone/domain name in the plugin config.
Rate limited by Let's Encrypt
Let's Encrypt's production environment limits you to a handful of certificates per registered domain per week. If you're testing your setup repeatedly, switch the ACME account's endpoint to Let's Encrypt V2 Staging first, confirm the whole flow completes successfully, then re-register against production once you're confident it works.
Certificate ordered but browser still shows the old one
Hard-refresh the browser tab, or restart pveproxy manually to force it to reload the certificate files:
systemctl restart pveproxyRenewal silently stopped working
Check journalctl -u pve-daily-update.service for the most recent run's output. The most common cause is an expired or revoked DNS provider API token — Proxmox can't complete the DNS-01 challenge again if the credentials it stored are no longer valid.
Frequently asked questions
Do I need a paid SSL certificate for Proxmox VE?
No. Let's Encrypt certificates are free, and Proxmox's built-in ACME client handles the entire issuance and renewal lifecycle for you.
Can I use this for a purely internal, non-internet-facing Proxmox host?
Yes, via DNS-01. As long as you can create DNS records for the domain (even if the domain itself doesn't need to resolve to a publicly reachable IP for anything other than the TXT record), Let's Encrypt will issue a certificate. The web UI itself can stay firewalled off from the internet entirely.
What happens if I rename or reinstall a node?
The ACME domain configuration lives in that node's local configuration, not in shared cluster storage. If you reinstall a node, you'll need to re-add the domain and re-order the certificate.
Will this replace the certificate used for Proxmox Backup Server or Proxmox Mail Gateway too?
No — this guide covers Proxmox VE's pveproxy certificate specifically. PBS and PMG have their own, separate ACME configuration in their respective web interfaces, following the same general workflow.
Is there a limit to how many domains one node can have?
No hard limit — you can add several domains/SANs to a single node if it's reachable under multiple hostnames, and Proxmox will request a single certificate covering all of them.
Can I switch from a custom uploaded certificate to ACME later, or vice versa?
Yes, freely. Ordering an ACME certificate overwrites whatever was previously in pveproxy-ssl.pem/pveproxy-ssl.key, including a manually uploaded one, and uploading a custom certificate likewise overwrites an ACME-issued one. Just be aware that switching back to custom certificates means you lose automatic renewal until you switch back to ACME.
Does this affect the noVNC/SPICE console or only the main web UI?
It covers the same pveproxy service that serves both the web UI and the noVNC console proxy, so console connections benefit from the trusted certificate too. It does not touch the separate cluster-internal certificate used for corosync/pmxcfs communication between nodes.
Wrapping up
Setting up ACME on Proxmox VE takes maybe ten minutes and, once done, you never think about certificate renewal again. For internet-facing nodes, HTTP-01 is the path of least resistance. For homelabs and internal deployments behind NAT, DNS-01 with a provider plugin (or alias-mode delegation) gets you a fully trusted certificate without opening a single inbound port. Either way, it's a small change that removes a recurring browser warning and a common source of "just disable TLS verification" shortcuts in your automation scripts.