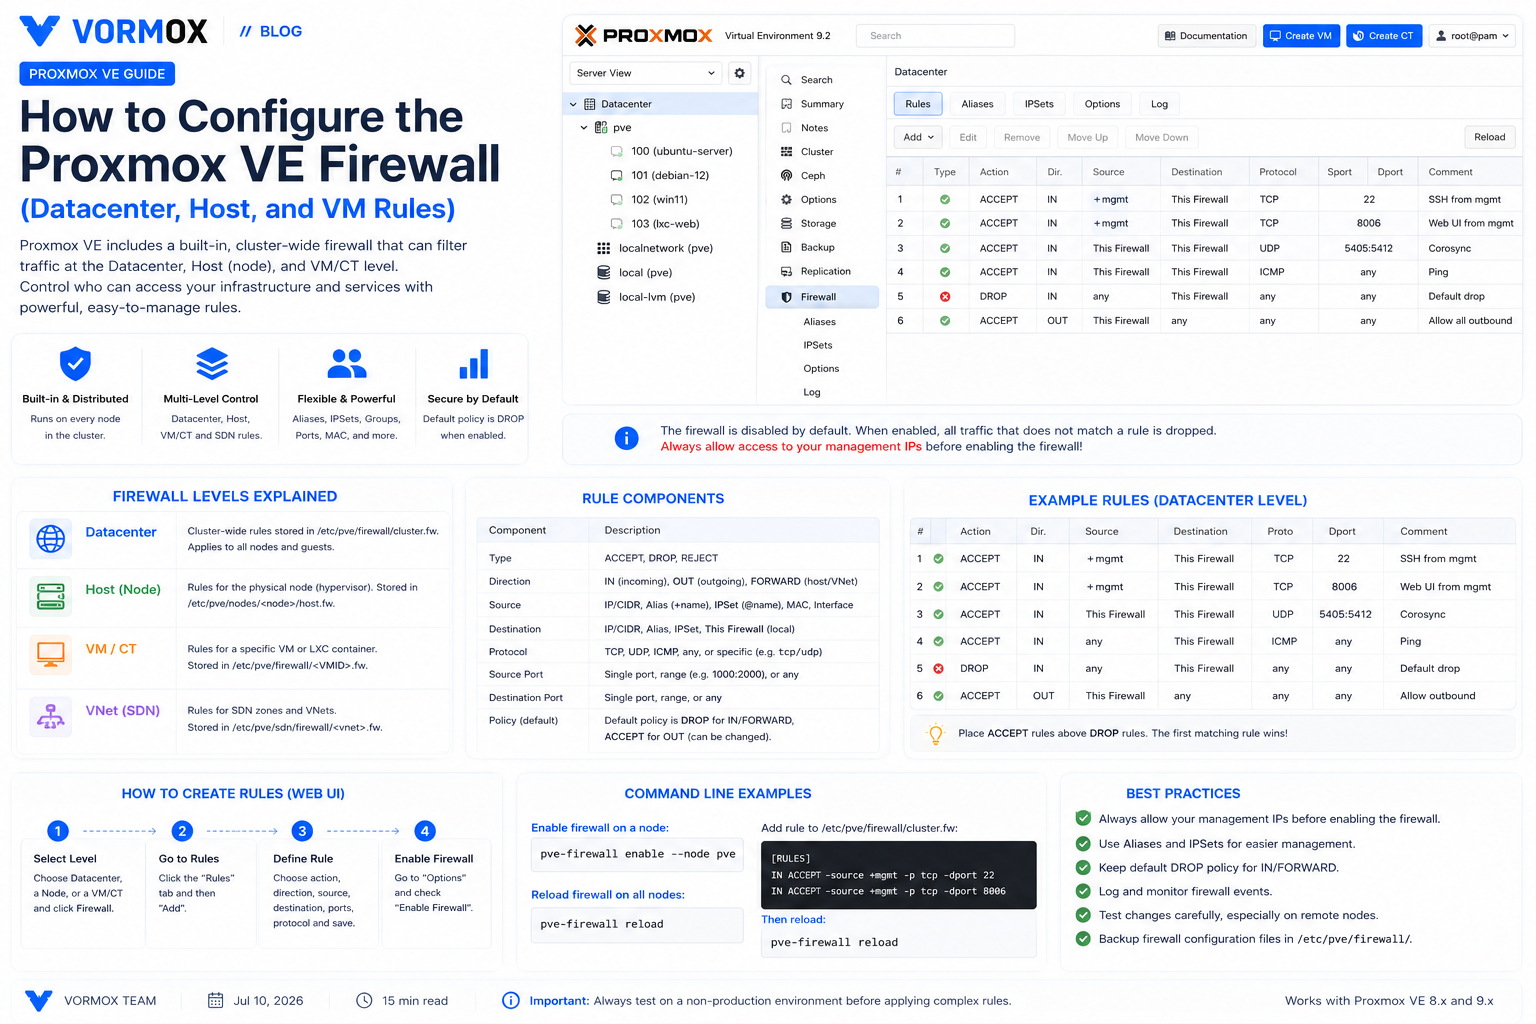
Proxmox VE ships with a built-in, distributed firewall that runs on every node in a cluster and can filter traffic at the datacenter level, the individual host level, and the level of each virtual machine or LXC container. Unlike a bolted-on perimeter firewall, it is aware of Proxmox objects — VMIDs, bridges, and cluster networks — which makes it possible to write rules like "allow SSH to this one VM from this one subnet" without hand-rolling iptables chains. Despite being included with every installation, the firewall is disabled by default and many admins never touch it beyond the initial cluster setup. This guide walks through the architecture, shows how to enable it safely (without locking yourself out), and covers the features that make it genuinely useful in production: security groups, IP aliases/IPSets, per-VM interface rules, and logging.
How the Proxmox VE Firewall Is Structured
The firewall is not one flat rule set. It is organized into layers that are evaluated together, and understanding the layering is the single most important thing before you flip it on.
Configuration levels
- Datacenter — cluster-wide rules stored in
/etc/pve/firewall/cluster.fw. These apply to every node and every guest unless overridden. - Host (node) — rules specific to one physical node, stored in
/etc/pve/nodes/<nodename>/host.fw. These govern traffic to and from the hypervisor itself (SSH, the web GUI on port 8006, corosync, etc.). - VM/Container — rules for an individual guest, stored in
/etc/pve/firewall/<VMID>.fw. These control traffic reaching that specific VM or CT, independent of what happens on the host. - VNet (SDN) — rules for software-defined network zones, stored in
/etc/pve/sdn/firewall/<vnetname>.fw. This is only relevant if you're using Proxmox SDN and the newer nftables-based firewall.
Because these configs live under /etc/pve, they are automatically replicated to every node in the cluster through the Proxmox cluster filesystem (pmxcfs) — you don't need to copy files around manually.
Traffic zones and directions
Every rule applies to a zone (Host, VM, or VNet) and a direction:
- IN — traffic arriving at the host or guest.
- OUT — traffic leaving the host or guest.
- FORWARD — transit traffic passing through the node (relevant at the host and VNet level; ordinary VM firewall rules cannot define a FORWARD direction on the stock iptables backend).
Rules are evaluated top-to-bottom within their section, and the first matching rule wins. If nothing matches, the configured default policy for that direction applies.
Prerequisites
- A working Proxmox VE 8.x or 9.x installation, single node or clustered.
- Root or a user with
Sys.Modifypermission on/(needed to change firewall settings). - Out-of-band access to the node (IPMI, iDRAC, physical console, or a hypervisor console session) as a safety net. Firewall misconfiguration is one of the few Proxmox mistakes that can genuinely lock you out remotely.
- A known list of management IPs (your workstation, jump host, VPN range) that must always retain access.
Step 1: Plan Your Access Before You Enable Anything
The firewall defaults to a DROP policy for incoming traffic once enabled at a given level, with a small allowlist for cluster communication. If you enable the datacenter or host firewall without first creating an allow rule for your own management IP, you can cut off SSH and GUI access to the node in a single click.
Before touching the enable checkbox anywhere, decide:
- Which IP address(es) or subnet you administer Proxmox from.
- Whether you want the web GUI (TCP 8006) and SSH (TCP 22) reachable from anywhere or restricted to that management range.
- Whether cluster nodes need to reach each other over corosync (UDP 5405–5412) and migration traffic — this is allowed by default for cluster networks, but double-check if you have multiple NICs.
Step 2: Create a Management IP Alias
Aliases let you reference an IP or range by name instead of repeating it in every rule, which also makes rules easier to audit later.
- Go to Datacenter → Firewall → Alias.
- Click Add.
- Set:
- Name:
mgmt-workstation - IP/CIDR: your admin IP, e.g.
203.0.113.10/32, or your whole office/VPN subnet, e.g.10.10.0.0/24
- Name:
- Click Add.
You can also define this directly in /etc/pve/firewall/cluster.fw:
[ALIASES]
mgmt-workstation 203.0.113.10/32
Step 3: Add a Host-Level Rule to Protect Management Access
Go to Datacenter → <node> → Firewall → Rules and add an explicit ACCEPT rule before you enable the host firewall:
- Click Add.
- Direction: IN
- Action: ACCEPT
- Source:
+mgmt-workstation(the+prefix references the alias) - Dest. port:
22,8006 - Protocol: tcp
- Comment: "Admin access - SSH and GUI"
The equivalent line in host.fw:
[RULES]
IN ACCEPT -source +mgmt-workstation -p tcp -dport 22,8006 -log info
Only after this rule exists should you set the host firewall's default incoming policy to DROP and flip it on.
Step 4: Enable the Firewall at the Datacenter Level
- Navigate to Datacenter → Firewall → Options.
- Set Firewall to Yes.
- Leave Input Policy as DROP and Output Policy as ACCEPT for a typical setup — this blocks unsolicited inbound connections while letting the host and guests initiate outbound traffic freely (updates, DNS, NTP, etc.).
This corresponds to /etc/pve/firewall/cluster.fw:
[OPTIONS]
enable: 1
policy_in: DROP
policy_out: ACCEPT
Enabling the firewall at the datacenter level does not automatically enable it per node or per VM — those are separate toggles you'll set in the next steps. This is intentional: it lets you stage the rollout node by node instead of flipping every guest's firewall on simultaneously.
Step 5: Enable the Firewall on Each Node
- Go to Datacenter → <node> → Firewall → Options.
- Set Firewall to Yes.
- Confirm your management-access rule from Step 3 is present and correct.
- Save, then immediately test SSH and GUI access from your management IP in a second, still-open terminal session before closing your first one.
If you get locked out, the fastest recovery on a physical or console-accessible node is:
pve-firewall stop
This stops the firewall service and flushes the generated rules immediately, restoring access so you can fix the configuration and restart with pve-firewall start.
Step 6: Configure VM and Container Firewalls
VM/CT-level rules are independent of host rules — they filter traffic to and from the guest itself, regardless of what the hypervisor's own firewall does.
Enable the firewall on a guest's network interface
- Select the VM or container in the resource tree.
- Go to Hardware, edit the network device (e.g.
net0). - Check the Firewall checkbox and save. (This must be enabled per interface — a guest with two NICs can have the firewall active on one and disabled on the other.)
Set the guest's firewall options
- Go to the VM/CT's Firewall → Options tab.
- Set Firewall to Yes.
- Set Input Policy to DROP and add explicit ACCEPT rules for the services this VM actually exposes (e.g. 80/443 for a web server, 22 if you need direct SSH to the guest).
Example: a web server VM
[OPTIONS]
enable: 1
policy_in: DROP

[RULES]
IN ACCEPT -p tcp -dport 80
IN ACCEPT -p tcp -dport 443
IN ACCEPT -source +mgmt-workstation -p tcp -dport 22
This VM accepts HTTP/HTTPS from anywhere, SSH only from your management alias, and drops everything else inbound while allowing all outbound traffic (default OUT policy is ACCEPT unless you changed it).
The built-in ipfilter option
Each guest network interface also has an optional IP Filter toggle. When enabled, Proxmox automatically restricts the interface so it can only send traffic from its own configured IP addresses (and DHCP/NDP as needed) — a lightweight, automatic anti-spoofing control that's useful on multi-tenant hosts where you don't fully trust guest OS configuration.
Security Groups: Reusable Rule Sets
If you find yourself pasting the same three or four rules into every web server VM, use a security group instead.
- Go to Datacenter → Firewall → Security Groups.
- Click Create, name it, e.g.
webserver. - Select the new group and add its rules:
IN ACCEPT tcp dport 80,IN ACCEPT tcp dport 443. - Open any VM's Firewall → Rules tab, click Insert: Security Group, and select
webserver.
Updating the security group's rules later automatically propagates to every VM that references it — this is the main operational win over copy-pasted per-VM rules, since a port change or a new allowed range only needs to happen in one place.
IPSets: Managing Groups of Addresses
Where aliases map a name to one IP or CIDR, IPSets group multiple, possibly non-contiguous, addresses or ranges under one name — useful for things like "our office IPs" spread across several blocks, or a dynamic allowlist maintained by automation.
- Go to Datacenter → Firewall → IPSet.
- Click Create, name it, e.g.
trusted-admins. - Select it and add entries: individual IPs, CIDR ranges, or existing aliases.
Reference it in a rule with the + prefix, same as an alias: IN ACCEPT -source +trusted-admins -p tcp -dport 22.
Proxmox also ships two special, always-available sets:
- management — intended for hosts that should reach the Proxmox management interfaces.
- blacklist — addresses blocked from reaching any host or guest, cluster-wide, regardless of other rules.
Enabling Logging
Logging is off by default to avoid flooding the kernel log with routine traffic. Turn it on selectively while you're validating a new rule set, then dial it back for steady-state operation.
- In any Firewall → Options tab (datacenter, host, or VM), set Log Level In / Log Level Out to
infoordebug. - Or override on a single rule by adding
-log infoto that line in the config file, e.g.:
IN ACCEPT -p tcp -dport 443 -log info
View the resulting log from the node's Firewall → Log tab in the GUI, or on the command line:
tail -f /var/log/pve-firewall.log
Each line includes the VMID (0 for the host itself), the chain, a timestamp, the policy that matched, and packet details — enough to trace exactly which rule accepted or dropped a given connection attempt.
Verifying What's Actually Running
The GUI shows your configuration, but it's worth confirming the generated ruleset matches your intent, especially after a change.
# Overall service status
pve-firewall status

# Inspect the generated iptables rules directly
iptables-save

# If using the newer nftables backend
nft list ruleset
pve-firewall status should report enabled/running; if it reports the firewall is enabled in the config but not running, check journalctl -u pve-firewall for a syntax error in one of your .fw files — a bad rule can prevent the whole ruleset from compiling.
Common Pitfalls
- Enabling the datacenter firewall without a management allow rule. This is the single most common way admins lock themselves out. Always create and verify your admin ACCEPT rule first.
- Forgetting the per-interface Firewall checkbox on a VM. You can set a full rule set under a VM's Firewall tab and see nothing happen, because the network device's own "Firewall" checkbox in Hardware is still unchecked — that checkbox is what actually attaches the ruleset to the interface.
- Assuming host rules protect VMs, or vice versa. The host firewall governs traffic to the hypervisor itself; it does not filter traffic destined for a VM's own IP. Each layer needs its own rules for its own traffic.
- Expecting FORWARD rules to work on VM firewalls with the stock backend. On the default iptables-based firewall, FORWARD-direction rules are only meaningful at the host and VNet level, not on individual VM/CT rule sets.
- Not restarting guests after the first-time enable. The firewall hooks into a VM's network device at start time; toggling the Firewall checkbox on a running VM's interface generally takes effect without a restart, but if rules seem to not apply at all after first enabling, a restart of the guest resolves it.
- Multi-NIC nodes and corosync. If cluster/corosync traffic runs over a separate NIC than management traffic, make sure your host firewall rules don't inadvertently block UDP 5405–5412 on that interface — losing corosync connectivity can trigger cluster quorum issues independent of any HA fencing behavior.
A Minimal, Safe Rollout Checklist
- Create a
mgmt-workstationalias (or IPSet) with your real admin IP(s). - Add a host-level ACCEPT rule for SSH (22) and GUI (8006) from that alias, on every node.
- Enable the datacenter firewall with
policy_in: DROP,policy_out: ACCEPT. - Enable the firewall on one node, verify access, then repeat for the rest of the cluster.
- For each VM/CT you want to protect: enable the Firewall checkbox on its network interface, set
policy_in: DROPunder its Firewall Options, and add explicit ACCEPT rules for the ports it actually serves. - Group repeated rule sets into Security Groups.
- Turn logging on temporarily while validating, then reduce it once you're confident the rules are correct.
Advanced: Connection Tracking and IPS Integration
Two features are worth knowing about once the basic rule set is in place, even if you don't need them on day one.
Tuning connection tracking
Every accepted connection is tracked in the kernel's conntrack table so the firewall can recognize return traffic without a separate rule for it (this is what makes policy_out: ACCEPT safe to pair with policy_in: DROP). On a busy node — lots of guests, lots of short-lived connections — the default table size can fill up, and once it does, new connections start getting silently dropped even though your rules look correct. The host-level Options tab exposes:
nf_conntrack_max— the maximum number of tracked connections; raise this on hosts running many guests or high-connection-count workloads (mail relays, reverse proxies, VPN concentrators).nf_conntrack_tcp_timeout_established— how long an idle established TCP connection stays tracked; lowering it frees table space faster at the cost of dropping very long-lived idle connections.
If you notice connections that should be allowed intermittently timing out or failing to establish under load, check dmesg for nf_conntrack: table full, dropping packet before assuming the rule set itself is wrong.
SYN flood protection
The host-level option protection_synflood enables a basic rate limit on new TCP connection attempts, intended as a lightweight defense against simple SYN floods rather than a full DDoS mitigation layer. It's disabled by default; enabling it is reasonable for internet-facing nodes, but test it under your normal peak traffic first, since an overly aggressive rate limit can throttle legitimate bursts (a backup window opening many connections at once, for example).
Forwarding accepted traffic to an IPS
For deployments that already run Suricata or a similar inline intrusion prevention system, Proxmox VE can hand off packets that pass the firewall to the IPS queue via the kernel's nfnetlink_queue mechanism, rather than requiring a separate physical or virtual inline tap. This is a niche setup — most homelab and small-business deployments won't need it — but it means you don't have to choose between the Proxmox firewall and a signature-based IPS; the two can be chained.
Migrating From a Perimeter-Only Firewall
If your current setup relies entirely on an edge firewall or router ACLs and every VM is otherwise wide open on the internal network, resist the urge to enable policy_in: DROP everywhere in one pass. A safer migration path:
- Enable the firewall cluster-wide with
policy_in: ACCEPTfirst, and logging turned on. This changes nothing about what traffic is allowed, but starts populating/var/log/pve-firewall.logso you can see real traffic patterns. - Review a few days of logs to build an accurate picture of what each VM actually receives, rather than guessing.
- Write ACCEPT rules for the traffic you found, flip that VM's policy to DROP, and watch the logs for unexpected drops for a day before moving to the next VM.
- Once every guest has been migrated individually, switch the datacenter default to DROP as the final step, now that host-level rules already cover the exceptions you need.
This is slower than flipping the switch everywhere at once, but it avoids the scenario where a rarely-used but important service (an internal monitoring agent, a scheduled backup target, a legacy management port) gets silently cut off weeks after the change, long after anyone remembers the firewall rollout as the cause.
Frequently Asked Questions
Does enabling the Proxmox firewall slow down VM networking?
The performance impact is generally minimal because the firewall runs per-node against local traffic rather than routing everything through a central appliance. Heavy connection-tracking workloads (thousands of concurrent connections) can add some CPU overhead, which is one reason the nf_conntrack table size is tunable in the host options if you need to raise it.
Can I use the Proxmox firewall instead of a firewall inside the guest OS?
You can, but running both isn't wasted effort: the Proxmox-level firewall is your outer layer of defense and centralizes policy management, while an in-guest firewall (ufw, firewalld, Windows Firewall) protects the VM even if it's ever moved or cloned to an environment where the hypervisor-level rule doesn't apply.
What happens to firewall rules when I clone or migrate a VM?
The VM's <VMID>.fw file is tied to its VMID, not to a specific node, so rules follow the VM through live migration within the cluster. Cloning creates a new VMID and, depending on clone type, may or may not carry over the firewall configuration — always check the new VM's Firewall tab after cloning.
Is the nftables-based firewall ready to use instead of iptables?
As of recent Proxmox VE releases, the nftables backend (proxmox-firewall) is offered as a technology preview, primarily to support FORWARD rules on VNets and guests, which the stock iptables backend cannot do. For production clusters, the default iptables-based firewall remains the well-tested option unless you specifically need SDN-level forwarding rules.
How do I temporarily disable the firewall everywhere without deleting my rules?
Set Firewall to No under Datacenter → Firewall → Options. This disables enforcement cluster-wide while leaving every rule, alias, and security group intact in /etc/pve/firewall/, so you can re-enable it later without reconfiguring anything.
Conclusion
The Proxmox VE firewall is easy to overlook because it's off by default and the cluster works fine without it — until an exposed VM or an open management port becomes the incident you didn't want. Because it's layered (datacenter, host, guest) and reuses the same alias/IPSet/security-group primitives at every level, a small amount of upfront planning — know your management IPs, write the allow rule first, roll out node by node — gets you a firewall that's genuinely maintainable rather than a pile of one-off iptables rules nobody remembers the reason for.