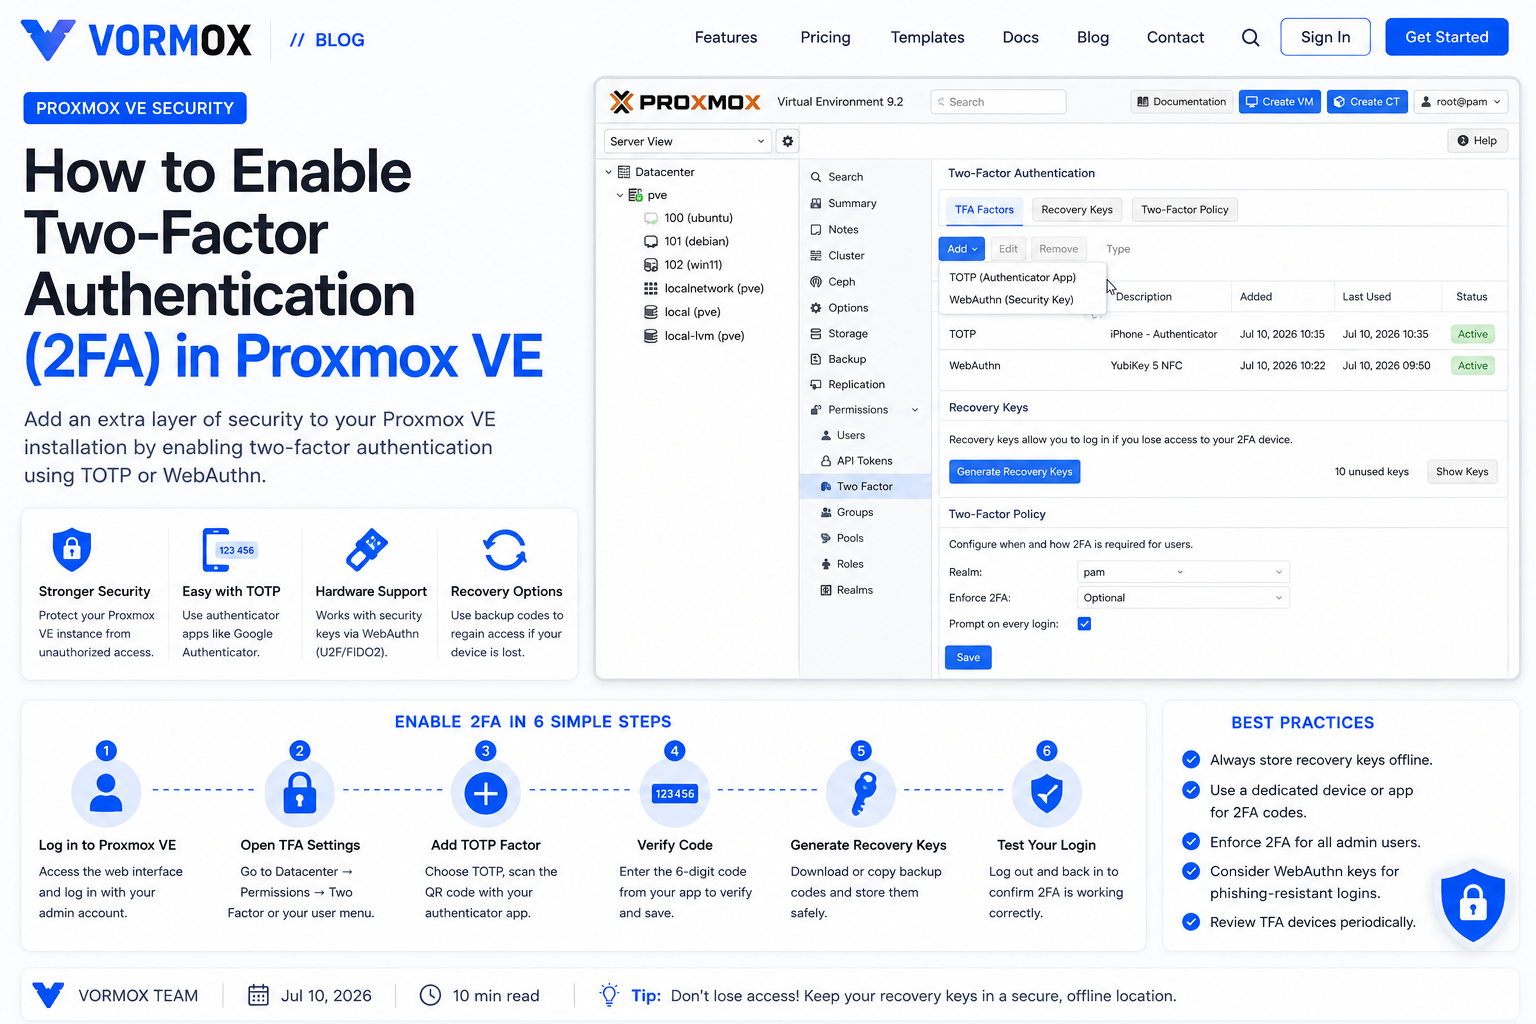
Somewhere around your third or fourth Proxmox node, it hits you: that root password is the only thing standing between your entire homelab and anyone who guesses it, phishes it, or finds it in a leaked password dump. If the Proxmox web UI is reachable from outside your LAN — even through a VPN with a weak passphrase — a single stolen password is game over. Two-factor authentication closes that gap, and Proxmox VE has supported it natively for years now.
This tutorial walks through turning on 2FA for a Proxmox VE 9.x install, using the built-in TOTP (time-based one-time password) method most people reach for first. You'll enroll an account, generate backup codes, and — if you want to go further — force every user on a realm to set up a second factor before they can log in at all.
What You Will Learn
- What two-factor authentication actually protects against, and what it doesn't
- The difference between TOTP, WebAuthn, and recovery keys in Proxmox
- How to enroll a user in TOTP through the web interface, step by step
- How to generate and store recovery keys so a lost phone doesn't lock you out
- How to enforce a Two-Factor Policy at the datacenter level
- What to do when you get locked out anyway, because it happens
What Is This Feature?
Two-factor authentication, or 2FA, means logging in requires two separate proofs of identity instead of one. The first is something you know — your password. The second is something you have, like your phone generating a six-digit code, or a physical security key you plug into a USB port.
Proxmox VE supports three second-factor methods, and they're not interchangeable in how they work:
| Method | What it is | Best for |
|---|---|---|
| TOTP | A 6-digit code generated by an app like Google Authenticator, Aegis, or Bitwarden, refreshed every 30 seconds | Most homelab and small business users — free, no extra hardware |
| WebAuthn | A hardware security key (YubiKey) or platform authenticator (Windows Hello, Touch ID) | Admins who want phishing-resistant login for a small number of accounts |
| Recovery Keys | A list of single-use backup codes generated once and stored offline | Everyone — this is your safety net, not a primary method |
TOTP is the one this guide focuses on, because it's free, works on any smartphone, and covers the vast majority of use cases. If you're already using a hardware key for other services, WebAuthn works the same way in Proxmox and the setup screen looks almost identical.
Why Would You Use It?
If your Proxmox host only ever talks to devices on a private, trusted LAN and nobody but you has physical access to the network, you could argue 2FA is optional. Most setups aren't that clean, though. People forward port 8006 through their router so they can check on a VM from work. They share the login with a partner or a colleague. They reuse a password they've used somewhere else, and that somewhere else gets breached eighteen months later.
2FA doesn't stop someone from trying to log in — it stops the login from succeeding once they've got the password. That's the whole point. An attacker with your root@pam credentials but no access to your phone is stuck at a code prompt they can't answer.
I'd still push back on doing this for every single account, though. A test user you spin up temporarily for a script doesn't need it. Root, and any account with real permissions on production VMs, absolutely does.
Prerequisites
- A working Proxmox VE install — this guide is written against 9.2, but the steps are identical back to 8.0
- Admin access to the web UI, typically as
root@pam - An authenticator app on your phone (Google Authenticator, Microsoft Authenticator, Aegis, or a password manager with TOTP support like Bitwarden)
- A way to store recovery codes somewhere other than the phone that generates your TOTP codes — a password manager or a printed sheet in a drawer both work
- An active SSH session to the host, kept open in a second terminal, in case something goes wrong while you're testing
That last point matters more than it sounds like it should. Enforcing 2FA before you've actually enrolled root is the single most common way people lock themselves out of their own server.
Step-by-Step Tutorial
We'll enroll a single user first, confirm login actually works, and only then talk about forcing it for everyone.
Step 1: Log in and find the TFA settings
Open the Proxmox web UI at https://your-server-ip:8006 and log in as normal. There are two paths to the TFA screen, and they land in the same place:
- Click your username in the top-right corner, then choose TFA from the dropdown — this manages your own account's second factors
- Or go to Datacenter → Permissions → Two Factor, which lets an admin manage TFA for any user, plus set realm-wide policy
Step 2: Add a TOTP factor
Click Add, choose TOTP from the type dropdown, and Proxmox generates a QR code on the spot along with a secret key printed underneath it, for anyone whose phone camera won't cooperate.
Open your authenticator app, scan the code, and it'll show you a fresh 6-digit number every 30 seconds. Type that number into the Verification Code field in Proxmox, give the entry a description like "iPhone — Authenticator app" so future-you knows which device this is, and click Add.
If the code gets rejected, don't panic and don't mash the button. Wait for the app to generate a new code — TOTP codes are single-use within their 30-second window, and re-submitting a stale one always fails.
Step 3: Add recovery keys immediately
Right after TOTP is confirmed, click Add again and pick Recovery Keys. Proxmox generates a set of one-time codes — save every single one of them somewhere that isn't the phone you just used for TOTP. If that phone gets lost, stolen, or factory-reset, these codes are the only way back into your account without SSH access.
This step gets skipped constantly. It's the one that actually saves you when things go wrong.
Step 4: Test it before you rely on it
Log out and log back in. Proxmox should now prompt for your TOTP code after you enter your password. If it doesn't ask, double-check you saved the TOTP entry — sometimes people close the dialog before clicking the final Add.
Step 5 (optional): Enforce a Two-Factor Policy for the whole realm
Enrolling yourself is one thing. Making it mandatory for everyone on a realm — so nobody can log in without a second factor, full stop — is a separate setting. Under Datacenter → Permissions → Two Factor, you can set a policy that blocks dashboard access for any account without an enrolled factor.
Do not turn this on until root, and every other account that needs to log in, already has TOTP or a recovery key set up. Enable the policy first and you'll find yourself staring at a login screen you can't get past.
Step 6: The command-line route for realm-wide OATH
There's also an older, realm-level OATH mechanism you can set from the shell, which some admins prefer for scripted deployments:
pveum realm modify pam --tfa type=oathKeep that SSH session open when you run this. If it goes sideways, you can SSH in, open /etc/pve/domains.cfg, and comment out the tfa type=oath line under the pam section to back it out immediately.
Commands Explained
Most of this tutorial happens in the browser, since TOTP enrollment needs a QR code and there isn't a sane way to scan one from a terminal. Still, a couple of commands are worth knowing:
pveum realm modify pam --tfa type=oath— sets OATH-based two-factor authentication as a requirement on thepamauthentication realm. This is the CLI equivalent of the datacenter-level Two-Factor Policy, and it applies to every user authenticating against that realm.pveum user list— prints every configured user across all realms, useful for confirming exactly who will be affected before you flip on a realm-wide policy.cat /etc/pve/domains.cfg— shows the raw realm configuration, including anytfadirective. Handy for a quick sanity check, or for manually editing your way out of a lockout over SSH.
Common Errors
A few messages show up often enough that they're worth calling out by name.
"Login failed. Please try again" after entering a TOTP code almost always means one of two things: the code expired before you submitted it, or the server and your phone disagree about what time it is. TOTP math depends on both sides agreeing on the current time within a few seconds.
Getting stuck on the TFA prompt with no way past it usually means the Two-Factor Policy was enabled for a realm before every account on it had a factor enrolled. This is the lockout scenario the prerequisites section warned about.
"No such user" or a blank TFA list after adding a factor for someone else can happen if you were managing TFA under the wrong realm — a user on pve won't show up when you're looking at pam, and vice versa.
Troubleshooting
If TOTP codes keep failing even though you're typing them correctly, check the clock on the Proxmox host first:
timedatectl statusIf the time is off by more than 30 seconds or so, TOTP codes will fail even when everything else is correct. Make sure NTP syncing is active — on a standard Proxmox install this is handled by systemd-timesyncd or chrony, and a quick restart of the service usually resolves drift:
systemctl restart systemd-timesyncdIf you enabled the realm-wide policy too early and every account is locked out, SSH into the host — this is why we kept that session open — and edit the realm config directly:
nano /etc/pve/domains.cfgFind the pam section, comment out or delete the tfa line, save, and log in again through the web UI. From there, finish enrolling every account properly before re-enabling the policy.
Lost your phone and don't have SSH access either? This is exactly what the recovery keys from Step 3 are for. Enter one at the login prompt in place of a TOTP code — each one works exactly once, so cross it off your list after use.
Best Practices
Enroll root@pam first, before anyone else, and before touching any policy setting. Root is the account you least want to lock yourself out of.
Generate recovery keys the same session you set up TOTP — not next week, not "later." Store them somewhere physically separate from the device generating your TOTP codes.
Don't rely on a single phone for every admin account if more than one person manages the cluster. Proxmox lets each user register multiple factors, so a shared team account can have several authenticator entries instead of one point of failure.
Keep an SSH session open any time you're changing realm-wide authentication policy, even if you've done it a dozen times before. The one time you skip it is the one time something breaks.
For anything internet-facing, honestly, consider a WebAuthn hardware key over TOTP for the accounts that matter most. It's a small extra step that removes phishing as an attack vector entirely, since the key checks the actual domain before it responds.
Frequently Asked Questions
Does 2FA slow down every login?
You'll type one extra 6-digit code each time. On a session that already remembers your browser, Proxmox won't re-prompt constantly — it's a few extra seconds, not a new ritual.
Can I use the same authenticator app for multiple Proxmox users?
Yes. Most apps support unlimited entries, so root, a monitoring account, and any other users can each have their own TOTP entry inside the same app.
What happens if I lose my phone and my recovery keys?
You'll need SSH or physical console access to the host to remove the TFA requirement from /etc/pve/domains.cfg or from the user's TFA entry directly. There's no remote reset button for a reason — that's what makes it secure.
Does 2FA replace a strong password?
No. It adds a second layer on top of one. A weak, reused password is still a weak, reused password — 2FA just means a stolen password alone isn't enough to get in.
Is WebAuthn better than TOTP?
For phishing resistance, yes — a hardware key verifies the actual domain it's talking to. For convenience and cost, TOTP wins, since it needs nothing but a free app. Plenty of admins use both: WebAuthn for their own account, TOTP for everyone else.
Do I need 2FA if Proxmox is only reachable on my LAN?
Strictly speaking, no. But LANs change — a new device joins, a port gets forwarded for a weekend, a laptop gets stolen with a saved session. It costs almost nothing to set up and it's there when the "only on my LAN" assumption stops being true.
Conclusion
Setting up 2FA on Proxmox VE takes maybe ten minutes, most of which is deciding where to store your recovery codes. The steps themselves are simple: enroll TOTP, save the recovery keys, test a logout and login, and only then think about making it mandatory for everyone else. Do the enrollment and testing in that order and you'll never end up staring at a lockout screen wondering what you broke. Skip the recovery keys or enable the policy too early, and you probably will.