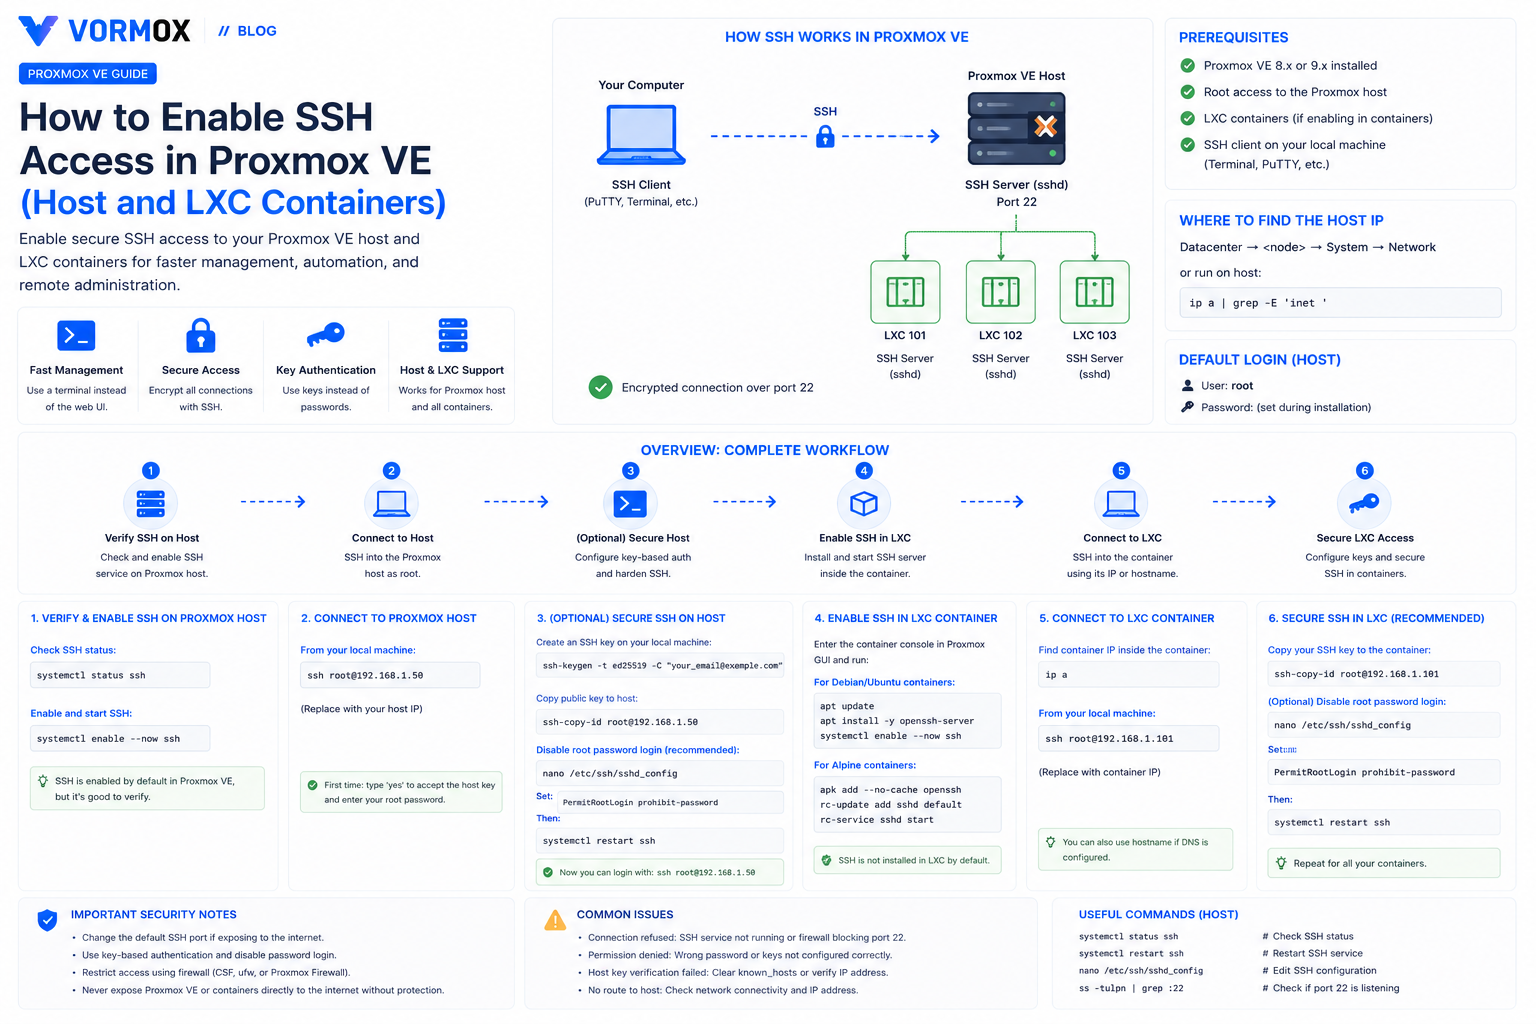
If you just installed Proxmox VE and tried to SSH into it from your laptop, only to get Connection refused or a password prompt that doesn't accept anything, you're not alone. SSH on the Proxmox host actually works out of the box for most fresh installs, but it behaves differently than you'd expect, and it works completely differently once you start creating LXC containers. Those are two separate systems with two separate sets of rules, and mixing them up is the number one reason people get stuck here.
This guide walks through both: connecting to the Proxmox host itself over SSH, and turning on SSH inside an LXC container (which does not come with it by default). By the end you'll be able to manage your node from a terminal instead of clicking through the web UI for every little thing, and you'll understand enough about sshd_config to lock things down properly afterward.
What You Will Learn
- Why Proxmox VE ships with root SSH login already turned on, and why that surprises people coming from Ubuntu or Debian
- How to confirm SSH is running and find the right IP address to connect to
- How to connect to the Proxmox host from Windows, macOS, and Linux
- How to install and enable SSH inside an LXC container, step by step
- How to set up key-based login so you're not typing a password every time
- The specific errors people hit —
Connection refused,Permission denied,Host key verification failed— and how to fix each one
What Is This Feature?
SSH, short for Secure Shell, is a protocol that lets you open an encrypted terminal session on a remote machine over the network. Instead of physically sitting at the server or using the Proxmox web console (which runs through your browser and can feel sluggish), you type ssh root@your-server-ip from your own terminal and you're logged in directly.
On the Proxmox host, SSH is handled by OpenSSH, the same server software used by nearly every Linux distribution. Proxmox VE is built on Debian — version 9.2 runs on Debian 13 "Trixie" — and the installer configures OpenSSH to start automatically, with root login allowed. That last part is unusual. Debian itself, and most other distros, disable direct root login by default and expect you to use sudo from a regular user account. Proxmox does it differently on purpose, mainly because a lot of cluster and storage operations (live migration, for example) need to move data between nodes as root.
Inside an LXC container, none of this applies. A container is a separate, lightweight Linux environment, and whatever OS template you picked for it decides what's installed. Debian and Ubuntu templates usually don't ship with an SSH server pre-installed, so you have to add it yourself.
Why Would You Use It?
The web GUI is fine for clicking through a handful of VMs, but it gets slow the moment you need to do anything repetitive: checking logs, copying files, running apt update across ten containers, or pulling configuration files off the host. SSH gives you a proper terminal, which means you can use scripts, copy-paste commands from documentation without retyping them, and use tools like scp or rsync to move files in and out.
It's also the foundation for a lot of things you'll want to do later — connecting from VS Code's Remote-SSH extension, running Ansible playbooks against your node, or setting up automated backup scripts that need to reach into a container. None of that works without SSH access first.
Prerequisites
- A working Proxmox VE installation (this guide is written against 9.2, but the steps are the same back through the 8.x series)
- Access to the Proxmox web UI, reachable at
https://your-server-ip:8006 - The root password you set during installation
- An SSH client on your own machine — this is built into macOS and Linux terminals, and into modern Windows via PowerShell or Windows Terminal
- Your Proxmox server's IP address (find it under Datacenter → your node → System → Network in the web UI, or by running
ip ain the console)
Step-by-Step Tutorial
Step 1: Confirm SSH is running on the host
Open the Proxmox web console for your node (click your node's name, then >_ Shell at the top right), and run:
systemctl status sshYou should see active (running) in green. On Debian-based systems the service is usually named ssh, though older guides sometimes reference sshd — both point to the same OpenSSH daemon. If it's not running, start it with:
systemctl enable --now sshStep 2: Connect to the host from your own machine
From a terminal on your laptop or desktop, run:
ssh root@192.168.1.50Replace 192.168.1.50 with your actual server IP. The first time you connect, you'll see a message about the authenticity of the host that can't be established, with a long string of letters and numbers (the host key fingerprint). Type yes and hit enter — this is normal and just means your SSH client hasn't seen this server before. Then enter your root password.
If that works, you're in. You'll land in a shell on the Proxmox host itself, same as the web console's Shell tab, just faster and resizable to your terminal window.
Step 3: Restrict root login to key-only (recommended, optional)
Leaving password-based root login open to the internet is asking for trouble, especially if you've forwarded port 22 on your router. Generate a key pair on your own machine first, if you don't already have one:
ssh-keygen -t ed25519 -C "your-email@example.com"Press enter through the prompts to accept the defaults (or set a passphrase if you want an extra layer of protection). Then copy the public key to your Proxmox host:
ssh-copy-id root@192.168.1.50Test that key-based login works — ssh root@192.168.1.50 should now drop you straight into a shell without asking for a password. Once you've confirmed that, edit the SSH configuration on the host:
nano /etc/ssh/sshd_configFind the line PermitRootLogin yes and change it to:
PermitRootLogin prohibit-passwordThis still allows root to log in — which Proxmox clustering and migration depend on — but only with a key, never with a password. Save the file (Ctrl+O, then Enter, then Ctrl+X in nano), and reload the service:
systemctl reload sshKeep your current SSH session open while you test this in a second terminal window. If you lock yourself out by mistake, you can always fix it from the web console's Shell tab, which doesn't go through SSH at all.
Step 4: Enable SSH inside an LXC container
This part trips people up because they assume containers behave like the host. They don't — a fresh Debian or Ubuntu LXC template usually has no SSH server at all. Enter the container from the host first. You'll need its container ID (CTID), visible in the left-hand resource tree in the web UI:
pct enter 105Replace 105 with your actual CTID. You're now inside the container's shell. Install OpenSSH:
apt update && apt install -y openssh-serverOn Debian and Ubuntu templates, the installer starts and enables the service automatically. Confirm it:
systemctl status sshFind the container's IP address:
ip aLook for the address under the container's network interface, usually something like eth0, in the same 192.168.x.x range as your host. Exit the container shell with exit, and from your own machine, connect directly to the container's IP the same way you did with the host:
ssh root@192.168.1.61If root login inside the container is disabled by the template's default sshd_config, create a regular user instead and use sudo, or adjust PermitRootLogin inside the container the same way you did on the host.
Commands Explained
| Command | What it does |
|---|---|
systemctl status ssh | Shows whether the SSH service is running, and whether it's set to start automatically at boot |
systemctl enable --now ssh | Starts the SSH service immediately and enables it to launch on every future boot |
ssh root@ip-address | Opens an encrypted remote terminal session to the target machine as the root user |
ssh-keygen -t ed25519 | Generates a new SSH key pair using the Ed25519 algorithm, which is faster and shorter than older RSA keys |
ssh-copy-id root@ip-address | Copies your public key to the target machine's authorized_keys file so you can log in without a password |
pct enter <ctid> | Drops you directly into a container's shell from the Proxmox host, without needing SSH or a password |
pct exec <ctid> -- <command> | Runs a single command inside a container from the host, without opening a full shell session |
apt install -y openssh-server | Installs the OpenSSH daemon package; the -y flag skips the confirmation prompt |
Common Errors
Connection refused — this almost always means the SSH service isn't running on the target, or you're pointing at the wrong IP or port. Double-check with systemctl status ssh on the host, or pct enter into the container and check there.
Permission denied (publickey,password) — you've disabled password auth (or set PermitRootLogin without-password) but the client isn't presenting a valid key. Try connecting with ssh -v root@ip-address to see verbose output about which authentication methods are being tried and rejected.
Host key verification failed — this shows up when a machine's SSH host key has changed, usually because you reinstalled the OS or reused an IP address for a different container. Remove the stale entry from your local ~/.ssh/known_hosts file, or run ssh-keygen -R 192.168.1.50 to do it automatically, then reconnect.
No route to host / Operation timed out — this is a network problem, not an SSH problem. Check that the container or VM actually has an IP, that it's on a bridge with the right VLAN settings, and that nothing in between (like the Proxmox firewall, if you've enabled it) is blocking port 22.
Troubleshooting
If SSH into the host worked yesterday and doesn't today, check whether the Proxmox firewall got turned on for that node — Datacenter → Firewall → Options, and separately under your node's own Firewall tab. A default-deny firewall with no rule permitting port 22 will silently drop your connection attempts, and it looks identical to the service just being down.
For containers specifically, an unprivileged LXC container (the default type Proxmox creates) runs with restricted permissions compared to the host. This rarely affects SSH itself, but it can affect what the container is allowed to do once you're logged in — don't be surprised if certain kernel-level operations that work fine on a VM fail inside a container.
If ssh-copy-id isn't available on your machine — it's missing from some minimal Windows and macOS setups — copy the key manually instead:
cat ~/.ssh/id_ed25519.pub | ssh root@192.168.1.50 "mkdir -p ~/.ssh && cat >> ~/.ssh/authorized_keys"Best Practices
- Switch to key-based authentication and set
PermitRootLogin prohibit-passwordas soon as you've confirmed keys work. Don't leave password auth open on a box facing the internet. - Change the default SSH port only if you understand the tradeoff — it stops the laziest automated scans, but it's not real security, and it makes your own life harder when you forget which port you picked.
- Use the Proxmox firewall to restrict which source IPs can even reach port 22, especially on a home server exposed to the internet for remote access.
- Keep at least one way back in that doesn't depend on SSH — the web console's Shell tab, or physical/IPMI access — before you tighten anything down. It's much less stressful to test a lockdown when you have a safety net.
- Give containers static IPs (or DHCP reservations) if you're going to SSH into them regularly. Chasing a changed DHCP lease every time you want to log in gets old fast.
Frequently Asked Questions
Is SSH enabled by default on Proxmox VE?
Yes, on the host. The installer sets up OpenSSH and allows root login with a password right out of the box. It is not enabled by default inside LXC containers — you install it yourself using the container's package manager.
Why can't I SSH into my container even though the VM works fine?
VMs run their own separate OS with whatever you installed on it, including SSH if the ISO or cloud image included it. Containers built from a bare template often don't include an SSH server at all until you install one with apt or the equivalent for that distro.
Is it safe to leave root SSH login enabled?
Password-based root login is the riskiest option, especially if the host is reachable from the internet. Key-only root login (prohibit-password) is a reasonable middle ground and is what Proxmox itself recommends for cluster nodes.
Can I use PuTTY instead of a terminal on Windows?
Yes, PuTTY still works fine. Modern Windows also includes OpenSSH natively in PowerShell and Windows Terminal, so you can just type ssh root@ip-address without installing anything extra.
What port does Proxmox SSH use?
Port 22 by default, the standard SSH port. This is separate from the web UI, which listens on port 8006.
Conclusion
Once you've got SSH working — on the host, and inside the containers you actually use — the web UI starts feeling like something you check in on occasionally rather than something you live in. Copying files with scp, running quick apt update passes across containers, or hooking up your editor's remote tools all become possible the moment a terminal can reach the machine directly.
Take the extra five minutes to switch root over to key-based login before you expose anything to the internet. It's a small step now, and it closes off the most common way homelab servers get compromised.