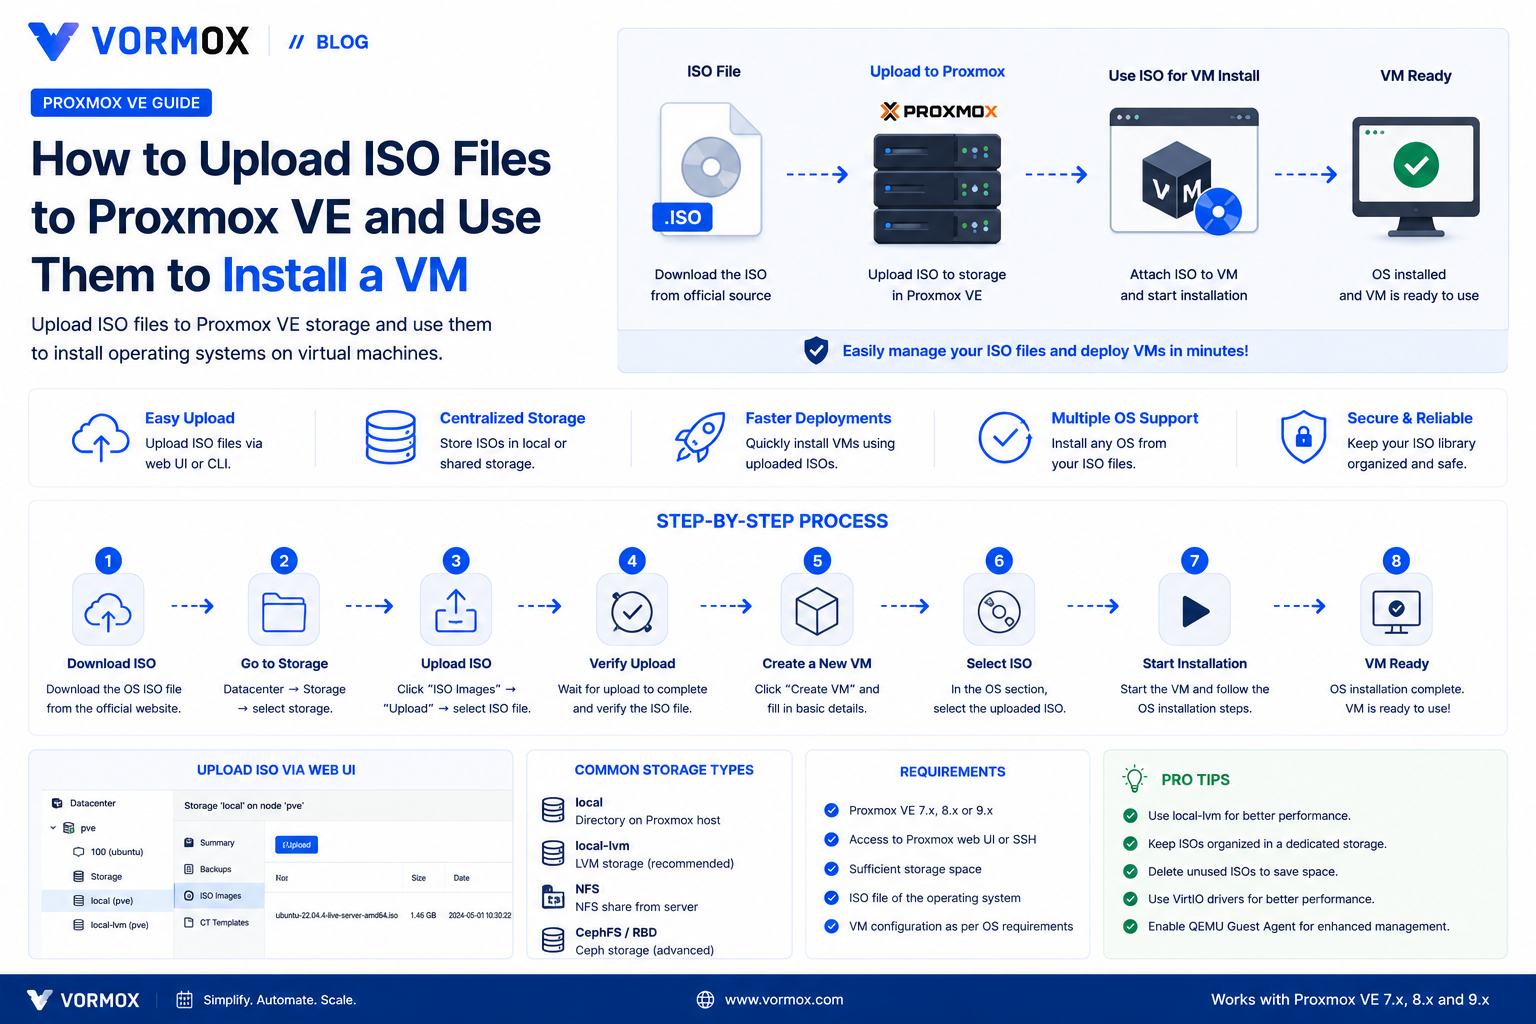
You just spun up Proxmox VE for the first time, clicked around the interface, and now you're staring at an empty virtual machine list wondering how you actually get an operating system onto one. Before you can install Ubuntu, Windows, or anything else, Proxmox needs the installer image — the ISO file — sitting somewhere it can read it.
That's what this tutorial covers: getting an ISO onto your Proxmox VE host so it shows up in the Create VM wizard. It sounds trivial once you've done it once. The first time, though, it's one of those small speed bumps that stops a lot of new users cold. You open the wizard, get to the OS step, and the ISO Image dropdown is just... empty.
We'll cover three different ways to get an ISO onto a node, when to use each one, and what to do when the upload fails partway through (it happens more often than you'd think on a slow home connection).
What You Will Learn
- What ISO storage actually is in Proxmox VE, and why it's tied to a specific storage location
- How to upload an ISO straight from your browser
- How to have Proxmox download an ISO directly from a URL, skipping your own PC entirely
- How to push large ISOs over SSH with
scpwhen the web upload keeps timing out - The permissions a non-root user needs before they can upload anything
- What the common error messages mean and how to fix each one
What Is This Feature?
In Proxmox VE, every storage location has a list of content types it's allowed to hold — things like disk images, backups, container templates, and ISO images. This matters because Proxmox won't let you upload an ISO to a storage location unless that location has the ISO image content type turned on.
On a fresh install, the default storage called local already has this enabled, and it points at /var/lib/vz/template/iso on the host's disk. That's why, on a single freshly installed node, uploading an ISO usually just works without you touching any storage settings first.
Where it gets less obvious is once you add a second storage location — say, an NFS share or a separate ZFS pool. Neither of those will show up as an upload target for ISOs until you explicitly enable the ISO images content type on them. Proxmox doesn't guess; you tell it what each storage is for.
Why Would You Use It?
Every VM you install manually — as opposed to cloning one or deploying from a template — needs installer media at boot. That's the ISO. Without one attached to the VM's virtual CD-ROM drive, the installer has nothing to boot into.
There's a second path some people take later on: Cloud-Init images. These are pre-built disk images (not ISOs) that boot straight into a running, configured OS without an interactive installer, which is handy for automation. But that's a different workflow with its own setup, and it's not what most beginners need for their first VM. If you're installing Windows, Debian, Ubuntu, or pretty much anything the normal way, you need an ISO uploaded first. This guide sticks to that.
Prerequisites
Before you start, make sure you have:
- A working Proxmox VE install you can reach at
https://your-server-ip:8006 - Either the root account, or a user with the Datastore.AllocateSpace permission on the target storage (root has this by default)
- An ISO file already downloaded to your PC, or a direct download URL for one (this matters for which method you pick)
- Free disk space on the target storage — a Windows 11 ISO runs close to 6 GB, most Linux ISOs land between 1 and 3 GB
- SSH enabled on the host if you plan to use the
scpmethod (covered later)
Step-by-Step Tutorial
Method 1: Upload Through the Web Interface
This is the method almost everyone starts with, and it's fine for ISOs under a few gigabytes on a reasonably fast connection.
- Log into the Proxmox web interface and select your node in the left-hand tree.
- Expand it and click local (or whichever storage has ISO images enabled).
- Click ISO Images in the resource tree on the left side of that storage's view.
- Click the Upload button near the top.
- Click Select File, browse to the ISO on your computer, and pick it.
- Click Upload and wait. A progress bar shows percentage and transfer speed.
Do not close the browser tab while this runs. On a 20 Mbps home upload connection, a 4 GB ISO takes roughly 25-30 minutes — and if the tab closes or your laptop sleeps partway through, the upload just dies and you start over.
Method 2: Download From URL
If the ISO you want is sitting on a public mirror somewhere (a Debian or Ubuntu mirror, for example), there's no reason to pull it down to your PC first just to push it back up to Proxmox. Have the server fetch it directly instead.
- Go to the same ISO Images view as above.
- Click Download from URL instead of Upload.
- Paste the direct download link to the ISO.
- Optionally paste a SHA256 checksum in the Checksum field, and set the checksum algorithm — Proxmox will verify the download and refuse to keep it if it doesn't match.
- Click Download.
This runs entirely on the server's own connection, which is usually a lot faster and more stable than a home upload link. It's the method I'd default to whenever the ISO has a direct URL, honestly — fewer places for it to fail.
Method 3: Upload via SCP or wget Over SSH
For big files, or if your browser session keeps timing out on Method 1, dropping to the command line is more reliable. This needs SSH access to the host.
From your own machine, with the ISO sitting locally:
scp ubuntu-24.04-live-server-amd64.iso root@192.168.1.50:/var/lib/vz/template/iso/Replace the filename and IP address with your own. This copies the file straight into the default ISO storage path over an encrypted connection, and you'll see a progress percentage in the terminal.
If you'd rather have the Proxmox host pull the file itself instead of pushing it from your PC, SSH into the host directly and run:
cd /var/lib/vz/template/iso
wget https://releases.ubuntu.com/24.04/ubuntu-24.04-live-server-amd64.iso
Either way, once the file lands in that folder, refresh the ISO Images view in the web GUI and it appears — no import step needed, Proxmox just scans the directory.
Commands Explained
| Command | What it does |
|---|---|
scp file.iso root@host:/path/ | Copies a local file to a remote server over SSH. The root@host part is who you're connecting as and where; the trailing /path/ is the destination folder. |
wget <url> | Downloads a file from a URL directly to wherever you run the command. Used here to fetch an ISO straight onto the Proxmox host instead of onto your own PC first. |
sha256sum file.iso | Prints a checksum (a short fingerprint) of the file. You compare this against the checksum published by the OS vendor to confirm the download wasn't corrupted or tampered with. |
df -h /var/lib/vz | Shows free disk space on the filesystem that path lives on, in human-readable units (GB, not bytes). Run this before a big upload if you're not sure how much room is left. |
ls -lh /var/lib/vz/template/iso | Lists ISO files already in the default storage folder along with their sizes, so you can confirm an upload actually landed. |
Common Errors
| Error | What's actually going on |
|---|---|
| Upload button is greyed out, or ISO Images tab is missing entirely | The storage you selected doesn't have the ISO image content type enabled. Go to Datacenter > Storage, edit the storage, and tick ISO image under Content. |
TASK ERROR: unable to upload media - not enough space left | The storage's filesystem is full or nearly full. Check with df -h and either delete old ISOs or point uploads at a different storage. |
| Browser upload stalls at a fixed percentage and never finishes | Usually a connection drop or a reverse proxy timing out mid-transfer if you're accessing Proxmox through one. Switch to Method 2 or 3 instead of retrying the browser upload again. |
| Checksum mismatch after using Download from URL | Either you pasted the wrong checksum, or the mirror served a different (possibly older) build than the one the checksum was published for. Re-copy the checksum straight from the vendor's download page. |
| ISO uploaded fine but doesn't show up when creating a VM on a different node | ISOs on local storage only exist on that one node's disk. Other nodes in a cluster can't see them unless the ISO lives on shared storage like NFS or CIFS. |
Troubleshooting
If uploads keep failing partway through on a home connection, stop retrying the browser method and switch to Download from URL or scp. The web upload runs through the same session as your GUI login, and anything that interrupts that — a laptop going to sleep, a Wi-Fi drop, a browser extension deciding to reload the tab — kills the transfer with no resume option.
If a non-root user can't see the Upload button at all, check their permissions under Datacenter > Permissions. They need Datastore.AllocateSpace on the storage in question, which isn't part of the default read-only roles like PVEAuditor.
If you're in a cluster and an ISO seems to vanish depending on which node you're looking at, that's expected behavior, not a bug. Local storage is exactly that — local to one node. If you regularly build VMs across multiple nodes, it's worth setting up an NFS or CIFS share, mounting it as shared storage in Proxmox, and uploading your ISOs there instead. Every node in the cluster sees the same files.
And if df -h shows plenty of space but the upload still fails with a space error, check whether you're actually uploading to the storage you think you are. It's an easy mix-up when a host has both local (small root disk) and a separate local-zfs or similar (big data pool), and only one of them has room to spare.
Best Practices
Keep ISO filenames as they came from the vendor, or close to it — renaming ubuntu-24.04-live-server-amd64.iso to ubuntu.iso saves nothing and makes it harder to tell which build you actually have six months from now.
Verify checksums for anything you're installing on a machine that matters. It takes thirty seconds and it's the only way to know a download wasn't truncated or corrupted, especially over flaky connections.
Clean out old ISOs periodically. It's easy to accumulate five versions of the same distro on a homelab box, and each one is a few gigabytes you're not using. The ISO Images view lets you delete straight from the GUI.
If you run more than one node, put ISOs on shared storage from the start rather than uploading the same file to every node individually. It's less work up front and it means you're not troubleshooting "why can't node 2 see this ISO" three months later.
Frequently Asked Questions
Where does Proxmox actually store uploaded ISOs?
On the default local storage, they land in /var/lib/vz/template/iso on that node's disk. Other storage types keep them in a similarly named subfolder under their own mount point.
Is there a file size limit on ISO uploads?
Not one set by Proxmox itself. In practice, the limit is your available disk space and, for browser uploads, how stable your connection stays for the whole transfer. Large files are more reliably handled with scp or Download from URL.
Can I upload an ISO while a VM is running?
Yes. Uploading to storage has nothing to do with any running VM — it's just a file landing in a folder. You only need to stop a VM if you're changing which ISO is mounted in its virtual CD-ROM drive.
Why can't I see my uploaded ISO in the Create VM wizard?
Check that you're creating the VM on the same node the ISO was uploaded to, and that you've selected the right storage in the wizard's OS step. Both are common misses.
Do I need to unzip an ISO before uploading it?
No. ISO files are already a single disk image, not an archive. If your download came as a .zip, extract the .iso from inside it first — that's the file Proxmox needs.
Conclusion
Getting an ISO onto Proxmox is a five-minute task once you know where the ISO Images tab lives and which of the three methods fits your situation. Browser upload is fine for small files on a decent connection, Download from URL is the least fussy option when you have a direct link, and scp or wget save you when the web upload just won't cooperate.
With an ISO sitting in storage, you're clear to open the Create VM wizard and actually build something. That's usually the next thing worth doing once this part's out of the way.