Introduction
You're about to run a risky apt upgrade inside a VM, or maybe you're testing a config change on your Home Assistant box and you're not totally sure it won't break something. What you want is a quick undo button — not a full backup job, not twenty minutes of waiting, just a fast way to jump back to "before I touched anything."
That's exactly what a snapshot does in Proxmox VE. It's one of those features that looks small on the surface but ends up saving you constantly once you get into the habit of using it.
This walkthrough uses Proxmox VE 9.x, though everything here works the same on 8.x. The Snapshots panel hasn't changed shape in years, and neither has the underlying qm command.
What You Will Learn
- What a snapshot actually is, and how it's different from a backup
- Which storage types support snapshots and which don't
- How to take a snapshot from the web GUI and from the command line
- How to roll back to a snapshot, and what happens to your data when you do
- How to remove old snapshots so they don't quietly eat your disk space
- The errors you're most likely to run into and what causes them
What Is This Feature?
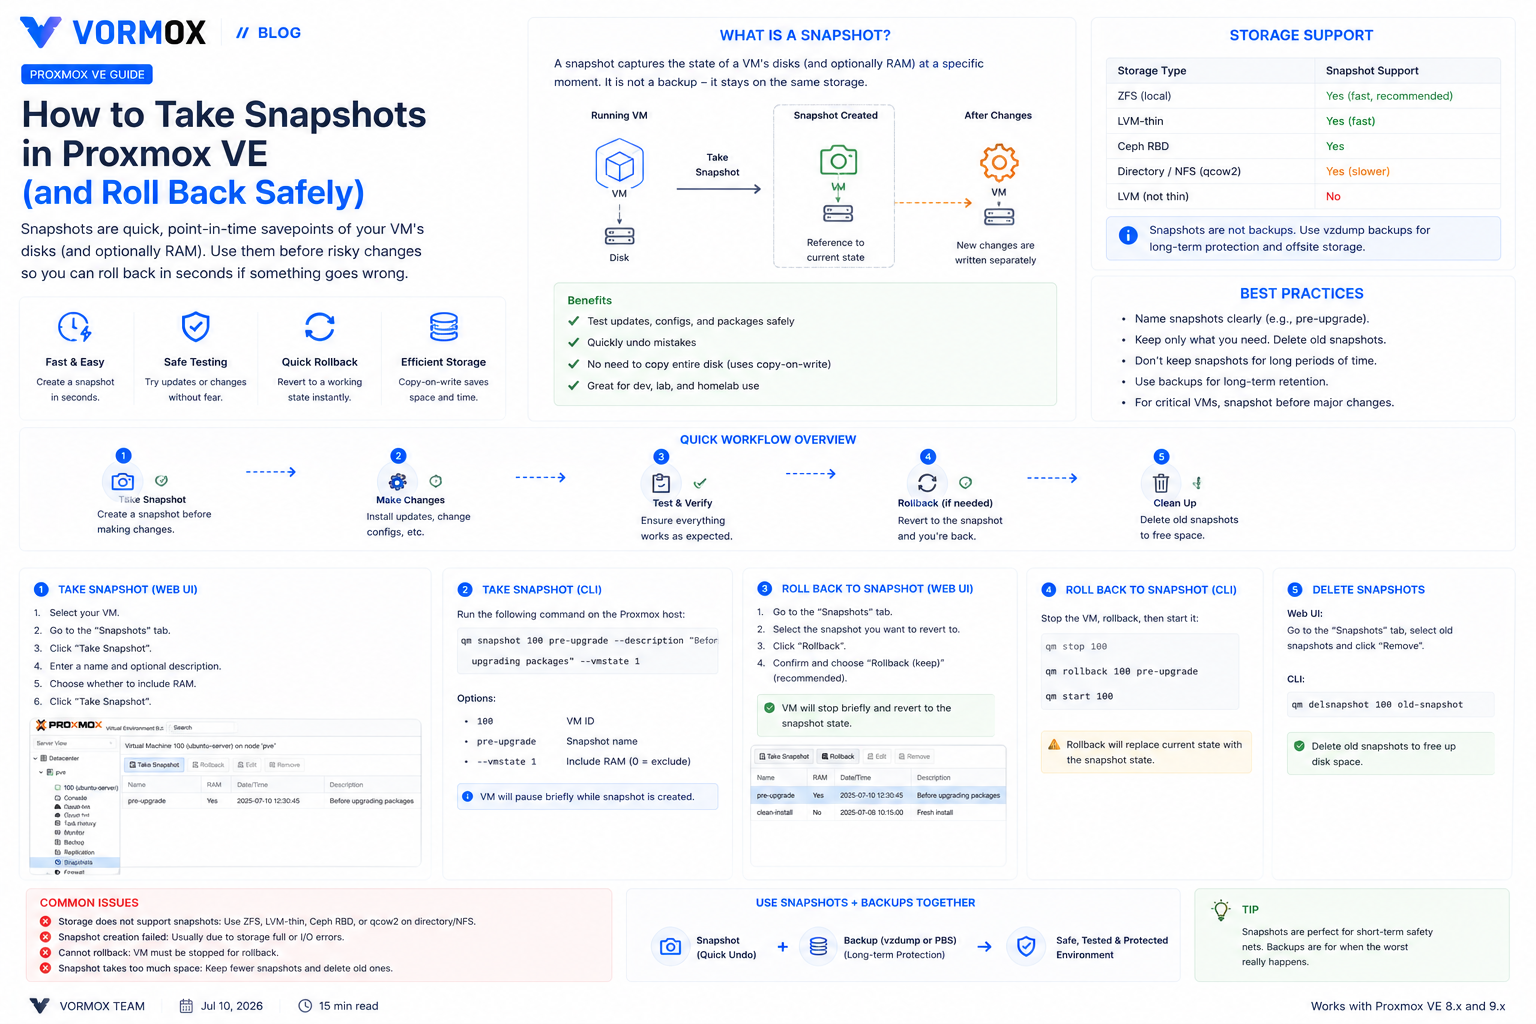
A snapshot is a point-in-time image of a VM's disks — and optionally its RAM — that you can jump back to later. Think of it like a savepoint in a video game. You save right before the boss fight, try something risky, and if it goes badly, you reload the save instead of starting the whole level over.
Under the hood, Proxmox doesn't copy your entire disk when you take a snapshot. Storage backends like ZFS and LVM-thin use copy-on-write: the snapshot just marks the current data as "don't overwrite this," and new writes go to fresh blocks. That's why taking a ZFS snapshot of a 100 GB disk takes about a second instead of several minutes.
On file-based storage, Proxmox uses the qcow2 disk format to do something similar, either as an internal snapshot inside the qcow2 file or, as of Proxmox VE 9, as a chain of separate volumes layered on top of each other. Either way, the goal is the same: capture a state you can return to without duplicating the whole disk.
One thing that confuses new users constantly: a snapshot is not a backup. It lives on the same storage as the VM's disks. If that storage dies, your snapshots die with it. A backup, made with vzdump, is a separate, portable copy that survives the original disk failing. Use snapshots for quick undos and backups for actual disaster recovery — they solve different problems.
Why Would You Use It?
The obvious case is testing something you're not 100% sure about. Before a major distro upgrade, a risky package install, or a config change to something like your firewall rules, take a snapshot first. If it goes wrong, you're back to a working state in under a minute instead of rebuilding the VM from scratch.
There's a second case people don't think about as often: snapshots make it painless to try things you'd otherwise avoid. Want to see what happens if you mess with your Nextcloud PHP settings, or test a kernel update on a production-ish VM? Snapshot first, experiment freely, roll back if needed. I use this constantly on homelab VMs I'd otherwise be too cautious to touch.
Where snapshots fall short: long-term retention. Keeping a snapshot around for six months just wastes storage and, on some backends, can slow down disk performance as the chain of changes grows. Snapshots are for short-term safety nets, not archives.
Prerequisites
- A running Proxmox VE 8.x or 9.x install with at least one VM or LXC container
- A VM disk on storage that actually supports snapshots — ZFS, LVM-thin, Ceph RBD, or a qcow2-backed directory/NFS storage
- Root access, or an account with the VM.Snapshot permission on the guest
- A few minutes of free time — snapshotting is fast, but rollback briefly stops the VM in most cases
If you're not sure what storage your VM's disk lives on, click the VM in the left tree, open the Hardware tab, and check the storage name listed next to the disk. Then look that storage up under Datacenter → Storage to see its type.
Step-by-Step Tutorial
Step 1: Check that your storage supports snapshots
Not every storage type can do this, and it's worth knowing before you rely on it.
| Storage type | Snapshot support | Notes |
|---|---|---|
| ZFS (local) | Yes, and fast | Native copy-on-write; the best option if you have it |
| LVM-thin | Yes, and fast | Local storage only, cannot be shared across cluster nodes |
| Ceph RBD | Yes | Works across a cluster; needs a Ceph setup already in place |
| Directory / NFS (qcow2) | Yes, but slower | Creating and deleting snapshots briefly blocks the VM |
| Plain LVM (not thin) | No | Block-level only, no copy-on-write layer |
If you're setting up a fresh Proxmox host and know you'll want snapshots, ZFS or LVM-thin is worth choosing during install instead of plain LVM. Retrofitting storage later means migrating disks, which is more work than picking the right one up front.
Step 2: Take a snapshot from the web GUI
- Click the VM in the left-hand tree.
- Open the Snapshots tab.
- Click Take Snapshot.
- Give it a name — something like
pre-upgradeorbefore-nextcloud-update. Spaces aren't allowed; use hyphens or underscores. - Add a description if you want a reminder of why you took it. Six months from now you won't remember what "test1" meant.
- Tick Include RAM if you want the VM's memory state saved too — useful if the VM is mid-task and you want to resume exactly where it left off, not just reboot into the same disk state.
- Click Take Snapshot and watch the task log at the bottom.
On ZFS or LVM-thin this finishes in a second or two. Including RAM takes longer, roughly proportional to how much memory the VM has allocated, since Proxmox has to write that memory out to disk.
Step 3: Take a snapshot from the command line
The GUI is really just calling qm snapshot behind the scenes:
qm snapshot 100 pre-upgrade --description "Before major upgrade"Here, 100 is the VM ID and pre-upgrade is the snapshot name. To include RAM state, add --vmstate 1:
qm snapshot 100 pre-upgrade --description "Before major upgrade" --vmstate 1For a container instead of a VM, swap qm for pct — the syntax is identical:
pct snapshot 200 pre-upgrade --description "Before major upgrade"Step 4: List existing snapshots
Before rolling back to anything, check what you actually have:
qm listsnapshot 100This prints a tree view showing each snapshot, its parent, and roughly when it was taken. The same view is available in the GUI's Snapshots tab as a list on the left side of the panel.
Step 5: Roll back to a snapshot
This is the part that actually saves you. In the GUI, open the Snapshots tab, click the snapshot you want, and hit Rollback. Proxmox asks you to confirm — say yes only if you're sure, because anything written after that snapshot gets thrown away permanently.
From the command line:
qm rollback 100 pre-upgradeIf the snapshot didn't include RAM, the VM comes back up in a stopped state — you'll need to start it manually. If it did include RAM, the VM resumes running exactly where it was when you took the snapshot, memory and all.
Step 6: Delete a snapshot you no longer need
Snapshots aren't free once you're past the initial write — the longer one sits around, the more changed data Proxmox has to track underneath it. Clean up ones you don't need:
qm delsnapshot 100 pre-upgradeFor containers, it's pct delsnapshot 200 pre-upgrade. In the GUI, select the snapshot in the Snapshots tab and click Remove.
Commands Explained
qm snapshot <vmid> <name>— creates a new snapshot with the given name for the specified VM.--vmstate 1— also captures the VM's RAM contents, letting you resume mid-session instead of just restoring disk state.--description "..."— attaches a human-readable note to the snapshot, shown in the GUI's snapshot tree.qm listsnapshot <vmid>— lists every snapshot that exists for a VM, in a parent-child tree.qm rollback <vmid> <name>— reverts the VM's disks (and RAM, if captured) back to the state saved in that snapshot.qm delsnapshot <vmid> <name>— permanently removes a snapshot, freeing the space it was holding onto.pct snapshot,pct rollback,pct delsnapshot— the same four commands, but for LXC containers instead of QEMU VMs.
Common Errors
"deleting snapshot: no such volume" — usually means the snapshot metadata and the actual storage got out of sync, often after an interrupted operation. Run qm listsnapshot <vmid> to check what Proxmox thinks exists, and compare it against what the storage backend actually has (for ZFS, zfs list -t snapshot).
"can't take snapshot - storage does not support snapshots" — you're on plain LVM or another block storage type that doesn't do copy-on-write. There's no workaround short of moving the disk to ZFS, LVM-thin, or a qcow2-backed storage.
"VM is locked (snapshot)" — a snapshot operation is still running, or one crashed mid-way. Wait for it to finish; if it's genuinely stuck, qm unlock <vmid> clears it, but only after you've confirmed nothing is actually still running.
Rollback greyed out in the GUI — this usually means the VM has snapshots with children snapshots taken after it, and Proxmox wants you to remove those first, or it means the VM is currently running and needs to be handled through the confirmation dialog rather than being blocked outright.
Troubleshooting
If snapshots are taking much longer than expected on a qcow2-backed NFS storage, that's expected behavior, not a bug — internal qcow2 snapshots on network storage are genuinely slow to create and delete. If this is a recurring pain point, moving that VM's disk to ZFS or LVM-thin solves it structurally instead of just living with the wait.
If your storage is filling up unexpectedly on a ZFS pool, check for old snapshots nobody remembered to clean up: zfs list -t snapshot -o name,used shows exactly how much space each one is holding. It's an easy thing to forget about after a big test session.
If a rollback seems to hang, check the task log under the VM's Task History tab rather than assuming it's frozen — on larger disks with a lot of changed data, the underlying storage operation can genuinely take a minute or two, especially on qcow2.
Best Practices
- Name snapshots by what you're about to do, not the date —
before-php-updatetells you more six months later thansnap1does. - Delete snapshots once you're confident the change worked. Don't let them pile up as a substitute for real backups.
- Only include RAM state when you actually need to resume a running session — it adds time and disk usage you don't need for a simple disk-state checkpoint.
- Don't treat snapshots as your only safety net for anything that matters. Pair them with real
vzdumpbackups for actual disaster recovery. - If you're about to test something destructive on a production VM, take the snapshot, do the risky thing, and verify before moving on to the next change — stacking untested changes on top of each other defeats the point.
Frequently Asked Questions
Can I take a snapshot of a running VM?
Yes, on supported storage. The VM keeps running through the snapshot itself; you only get downtime later, during rollback, if the snapshot didn't include RAM.
How many snapshots can I keep at once?
There's no hard limit in Proxmox itself, but performance and storage usage both degrade as the chain grows, especially on qcow2. Keep it to a handful at a time.
Does a snapshot protect me if the whole disk fails?
No. Snapshots live on the same physical storage as the VM. If that storage dies, the snapshot dies with it — that's what backups are for.
Can I rename a snapshot after creating it?
Not directly. You'd need to delete it and create a new one with the name you want, which also means losing the original point-in-time state.
Do snapshots work on LXC containers the same way as VMs?
Yes, using pct instead of qm, on the same storage types that support VM snapshots.
Conclusion
Snapshots aren't a backup strategy, and they're not meant to be. They're a fast, cheap undo button for the moments when you're about to do something to a VM and you're not fully sure how it'll go.
Get comfortable taking one before anything risky, and get equally comfortable deleting it once you know the change stuck. That habit alone will save you from more late-night VM rebuilds than almost anything else on this list.