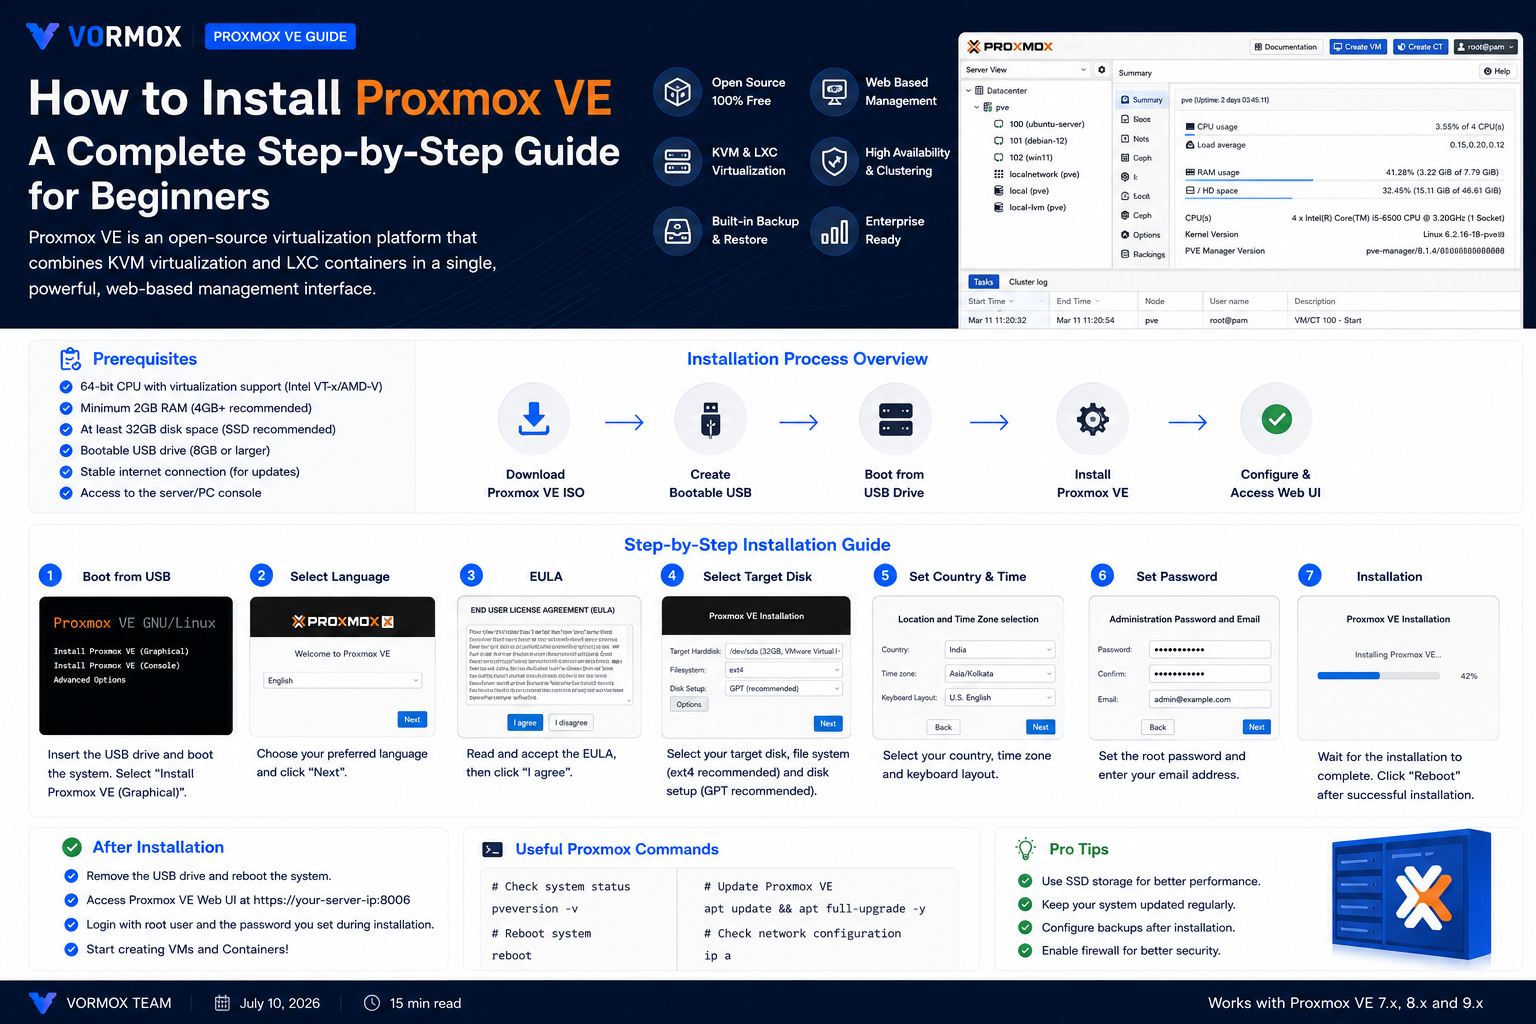
If you've spent any time in homelab forums or watched a few self-hosting videos, you've probably seen Proxmox VE mentioned as the go-to free alternative to VMware ESXi. What most of those videos skip over is the part where you actually sit down and install it. That's the part that trips people up: the wrong ISO writer, a BIOS setting that's off by default, a network card that doesn't show up. None of it is hard once you know what you're looking at, but the first time through it can feel like a lot.
This guide walks through the entire process on a spare PC, an old server, or a dedicated box from a hosting provider — from downloading the installer to logging into the web interface for the first time.
What You Will Learn
- What Proxmox VE actually is and why people choose it over VMware or Hyper-V
- The hardware you need before you start (and how to check for it)
- How to build a bootable USB installer on Windows, macOS, or Linux
- Every screen in the graphical installer, explained in plain terms
- How to log into the Proxmox web interface after your first reboot
- The errors people run into most often, and how to get past them
What Is This Feature?
Proxmox VE (the "VE" stands for Virtual Environment) is a free, open-source platform that turns a regular PC or server into a virtualization host. Once it's installed, that machine can run multiple virtual machines and Linux containers at the same time, each one isolated from the others, each one thinking it has the hardware to itself.
Under the hood, Proxmox is built on Debian Linux with a modified kernel, and it wraps two virtualization technologies — QEMU/KVM for full virtual machines and LXC for lightweight containers — in a web-based management interface. Proxmox VE 9.2 runs on Debian 13.5 ("Trixie") with kernel 7.0, QEMU 11.0, and LXC 7.0 under the hood, though you'll rarely need to think about those version numbers day to day.
You install it directly onto the hardware — no host operating system underneath it. That's what's called a type-1 or "bare metal" hypervisor, and it's the same category ESXi and Hyper-V Server fall into.
Why Would You Use It?
The honest answer is: because it's free, it's genuinely capable, and Broadcom's changes to VMware's licensing have pushed a lot of people to look for alternatives. Proxmox doesn't require a subscription to use every feature — the paid tier just gets you access to the more thoroughly tested "enterprise" package repository and official support.
Beyond the price, a few reasons people land on Proxmox specifically:
- Homelabs. One box can run a Windows VM, a couple of Ubuntu servers, and a handful of lightweight containers for things like Pi-hole or a media server — all managed from one browser tab.
- Learning virtualization. If you're studying for a sysadmin role or just want to understand how VMs and networking fit together, Proxmox gives you a real, unrestricted environment to break things in.
- Small business infrastructure. A single mid-range server can consolidate several old physical machines, and clustering (adding more nodes later) is built in if you outgrow one box.
- Dedicated servers. Plenty of hosting providers let you install Proxmox on a rented dedicated server, which is a cheap way to run several isolated projects on one rented box instead of paying for separate machines.
If you only ever need one or two VMs and nothing else, a simpler tool might be overkill. But the moment you want more than that, Proxmox stops feeling like extra complexity and starts feeling like the thing that was missing.
Prerequisites
Before you download anything, check that your hardware can actually run this.
| Requirement | Minimum (testing) | Realistic (daily use) |
|---|---|---|
| CPU | 64-bit with Intel VT-x or AMD-V | Same, plus more cores if running several VMs |
| RAM | 1 GB for the host | 8 GB+ so you have room left for guests |
| Storage | Any hard drive | An SSD — installs and VM disk I/O are painfully slow on spinning rust |
| Network | One NIC | One NIC is fine; a second is nice for separating management traffic |
Two things are worth checking before you go further:
- Virtualization extensions are enabled in the BIOS/UEFI. Most modern boards ship with Intel VT-x or AMD-V turned off by default. Look for a setting called "Intel Virtualization Technology," "SVM Mode," or similar, usually under a CPU or Advanced menu.
- You have a spare USB drive, 4 GB or larger. Everything on it will be erased.
You'll also need a second computer to download the ISO and write it to USB, and — ideally — a network cable rather than Wi-Fi, since Proxmox VE doesn't include Wi-Fi drivers out of the box.
Step-by-Step Tutorial
1. Download the Proxmox VE ISO
Go to the official downloads page at proxmox.com and grab the current release — Proxmox VE 9.2-1 at the time of writing, a roughly 1.7 GB hybrid ISO image. "Hybrid" just means the same file can be burned to a DVD or written raw to a USB stick; you don't need to do anything special to it first.
2. Write the ISO to a USB drive
How you do this depends on your operating system.
On Linux or macOS, first find the correct device name — get this wrong and you can overwrite the wrong disk, so double- and triple-check it:
lsblkThen write the image (replace /dev/sdX with your actual USB device, not a partition like /dev/sdX1):
sudo dd bs=1M conv=fdatasync if=./proxmox-ve_9.2-1.iso of=/dev/sdXOn Windows, use Rufus. This is the step people get wrong most often: Rufus needs to write the image in DD mode, not its default ISO mode. When it asks, choose "Write in DD Image mode." Balena Etcher works too and defaults to the correct raw-write behavior automatically. Tools like UNetbootin will not produce a bootable Proxmox installer — skip them.
3. Boot from the USB drive
Plug the USB drive into the target machine, power it on, and hit whatever key brings up the boot menu — commonly F11, F12, Esc, or Del depending on the manufacturer. Select the USB drive. You should land on the Proxmox boot menu; choose Install Proxmox VE (Graphical).
4. Accept the EULA and pick a target disk
After the license screen, you'll choose the disk Proxmox installs onto. Everything on that disk gets wiped, so if you have data drives you want to keep, unplug them first — it's a lot easier than being careful with checkboxes.
Click Options next to the disk selector and you'll see filesystem choices: ext4, XFS, BTRFS (still marked as a technology preview), or ZFS. ZFS is a filesystem with built-in RAID, checksumming, and snapshot support — useful if you have multiple drives and want redundancy without a separate hardware RAID card. For a single-disk homelab box, ext4 is the simpler, lower-overhead choice and what most beginners should pick.
5. Set location, timezone, and keyboard layout
The installer auto-detects these from your network, but check them anyway — a wrong keyboard layout makes the password step annoying if your layout maps symbols differently.
6. Set the root password and email address
Proxmox enforces a minimum of 8 characters here, but use something longer — this account has full administrative control over the host. The email address isn't just decoration: it's where the system sends alerts, including backup job failures and, later, any notifications you configure.
7. Configure the management network
Pick the network interface that's actually connected (it'll be marked "UP"), then set a hostname and either a static IP or DHCP-assigned address. If you're not sure yet, DHCP is fine for now — you can lock in a static IP afterward once you know it won't conflict with anything else on your network.
8. Review and install
The summary screen shows everything you just configured. Take thirty seconds to actually read it, then click Install. The process formats the disk and copies packages — on an SSD this usually takes five to ten minutes.
9. First boot and web interface login
Remove the USB drive when prompted and reboot. The console will show a URL once the system comes up — something like https://192.168.1.50:8006. Open that in a browser on another machine on the same network.
You'll hit a certificate warning first. That's expected — Proxmox generates a self-signed certificate during install, and your browser has no reason to trust it yet. Click through the "Advanced" or "Proceed anyway" option. Log in with username root, realm Linux PAM standard authentication, and the password you set during install.
You'll also see a pop-up about not having a valid subscription. That's normal for a free install and doesn't stop anything from working — it's just Proxmox reminding you that the "no-subscription" package repository isn't covered by paid support.
Commands Explained
| Command | What it does |
|---|---|
lsblk | Lists block devices (disks and partitions) so you can identify the correct USB drive before writing to it. |
dd bs=1M conv=fdatasync if=./iso of=/dev/sdX | Copies the ISO byte-for-byte onto the USB device. bs=1M sets the block size for reasonable speed; conv=fdatasync makes sure all data is physically written before the command exits, rather than sitting in a write cache. |
grep -E 'vmx|svm' /proc/cpuinfo | Run on an existing Linux machine to confirm your CPU supports virtualization before you buy or repurpose hardware. vmx means Intel VT-x support, svm means AMD-V. No output means no hardware virtualization support. |
Common Errors
A handful of problems account for most installation headaches:
- "No bootable device found." Almost always a USB writing problem — usually an ISO-mode write on Windows instead of DD mode, or a boot order in the BIOS that isn't checking USB first.
- The installer doesn't see any disks. Common on servers with hardware RAID controllers that need a specific driver, or NVMe drives on older BIOS firmware set to a compatibility mode that hides them. Switching the BIOS storage controller mode to AHCI, or checking for a RAID driver option, usually fixes it.
- Installer boots to a black screen. Some GPUs don't play nicely with the installer's default graphics mode. From the boot menu, try the "Install Proxmox VE (Terminal UI)" option instead — it's text-based and sidesteps the graphics driver entirely.
- Network interface not detected during setup. Rare, but happens with very new server NICs the installed kernel doesn't have a driver for yet. You can finish the install without network config and set it up afterward from the console.
Troubleshooting
If everything installed but you can't reach the web interface afterward, work through these in order:
Can't load the page at all. Confirm the IP address from the physical console — attach a monitor and keyboard if you don't already have one on the box. Ping that address from another machine. If it doesn't respond, the network configuration during install probably didn't take, often because DHCP wasn't available on that network segment.
Browser shows "connection refused" or times out on port 8006. Double-check you're using https://, not http:// — the Proxmox web UI doesn't listen on plain HTTP at all, so an http:// request will just fail rather than redirect.
Login fails with the correct password. Make sure the realm dropdown is set to Linux PAM standard authentication and not Proxmox VE authentication server — those are two separate user databases, and the root account only exists in the PAM one.
The certificate warning won't let you proceed. Some browsers hide the override behind an "Advanced" link, and some corporate or school networks block self-signed certificates outright. Try a different browser or a personal hotspot if you're stuck on a locked-down network.
Best Practices
A few habits will save you trouble down the line:
- Set a static IP for the host once you're past initial testing — DHCP renewals can change your management address at the worst possible time, and I've watched people lose access to a box mid-project because of it.
- Don't install Proxmox VE inside another virtual machine for anything beyond quick testing. Nested virtualization works, but performance and stability both take a hit compared to bare metal.
- Change the default "no-subscription" repository nag only if it actually bothers you — it's cosmetic and doesn't affect functionality. Chasing it away by adding the paid enterprise repo without a subscription key will break your updates instead.
- Take a note of your root password somewhere safe before you close that terminal window. Resetting it later means booting into recovery mode, which is doable but annoying.
- Run your first update before creating any VMs, from the shell:
apt update && apt full-upgrade. New installs are sometimes a few weeks behind the latest patches.
Frequently Asked Questions
Is Proxmox VE really free?
Yes. The full feature set is available without a subscription. Paid tiers add access to the more heavily tested enterprise repository and official support contracts, but nothing is functionally locked behind a paywall.
Can I install Proxmox VE alongside Windows on the same drive?
Not in any practical sense. Proxmox expects to own the disk you install it to, and dual-booting a hypervisor defeats the point — you'd need to install Windows as a VM inside Proxmox instead, which is the normal way to do it anyway.
How much RAM do I actually need?
The host itself is light — 1 to 2 GB is enough for Proxmox alone. What matters is how much you're handing out to VMs and containers on top of that. Add up what your guests need and pad it by a couple of gigabytes for the host.
Do I need a subscription key during installation?
No. The installer doesn't ask for one, and you won't need it unless you specifically want the enterprise repository later.
What happens to my data if I pick the wrong disk during install?
It gets erased during the format step. This is exactly why unplugging any drive you want to keep, before you even start the installer, is worth the extra two minutes.
Conclusion
Once you've done it, installing Proxmox VE feels almost anticlimactic — it's maybe fifteen minutes of active work, most of which is answering straightforward prompts. The parts that actually cause trouble are outside the installer itself: BIOS virtualization settings, a USB stick written the wrong way, a disk you forgot to unplug. Get past those, and you'll have a working hypervisor with a web interface ready to go.
From here, the natural next step is creating your first virtual machine or LXC container, then locking down the host with a static IP, SSH access, and basic firewall rules — each one is its own small task, and none of them require redoing anything you just set up.