Introduction
If you have ever clicked "Shutdown" on a Proxmox virtual machine and watched it just sit there, or tried to take a backup only to have Proxmox warn you that it can't "freeze" the filesystem, there is a good chance you are missing one small but important piece: the QEMU Guest Agent.
Proxmox VE is a free, open-source virtualization platform that lets you run virtual machines (VMs) and lightweight Linux containers on a single server. When you create a new VM, Proxmox can control the "hardware" side of things easily — starting it, stopping it, giving it more memory — but it has no idea what is actually happening inside the operating system. That's where the QEMU Guest Agent comes in.
In this tutorial, we'll explain exactly what the QEMU Guest Agent is, why it matters even for a simple homelab, and walk through installing and enabling it step by step on both Linux and Windows virtual machines.
What You Will Learn
- What the QEMU Guest Agent actually does and why Proxmox needs it
- How to enable the Guest Agent option on a VM in Proxmox VE
- How to install the Guest Agent inside Linux VMs (Debian, Ubuntu, RHEL/Rocky/AlmaLinux)
- How to install the Guest Agent inside Windows VMs using VirtIO drivers
- How to verify that the Guest Agent is working correctly
- Common errors you might see, and how to fix them
What Is This Feature?
The QEMU Guest Agent (often shortened to "QGA") is a small background program that runs inside your virtual machine's operating system. Its only job is to talk to the Proxmox host and answer questions about what's going on inside the VM.
Think of it this way: Proxmox runs your VM using a piece of software called QEMU, which emulates a computer's hardware. Normally, QEMU can only see the "outside" of that virtual computer — the CPU, the disk, the network card — but it can't see inside the guest operating system itself. The Guest Agent is a translator that sits inside the guest OS and reports information back out, and can also carry out a few safe actions on request.
Without the agent installed, Proxmox is basically guessing what's happening inside your VM. With it installed, Proxmox can ask questions like:
- "What is the VM's actual IP address right now?"
- "Can you flush your disk writes so I can take a safe backup?"
- "Please shut down cleanly instead of just losing power."
You'll also see the term VirtIO mentioned in this guide. VirtIO is a set of standardized, high-performance virtual hardware drivers used by QEMU and Proxmox. Instead of pretending to be a specific real-world network card or disk controller (which is slower to emulate), VirtIO devices are designed from the ground up for virtual machines, so they are much faster. The Guest Agent communicates with Proxmox over a special VirtIO serial connection, which is why some VirtIO components need to be installed first, especially on Windows.
Why Would You Use It?
You might be tempted to skip this step, especially if your VM already seems to work fine without it. Here's why it's worth the extra five minutes:
| Without Guest Agent | With Guest Agent |
|---|---|
| Proxmox shows no IP address for the VM in the summary tab | Proxmox displays the real, current IP address of the VM |
| "Shutdown" from the Proxmox GUI may not work reliably | Shutdown is sent directly to the guest OS and handled cleanly |
| Backups pause the VM's disk writes less safely | Backups can briefly "freeze" the filesystem for a consistent snapshot |
| Cloning and moving disks can risk minor data inconsistency | Filesystem state is synced before disk operations run |
In short, the Guest Agent makes Proxmox aware of what's actually happening inside the VM, instead of only seeing it from the outside. For anyone running real workloads — even a small homelab server you care about — this is one of the easiest reliability wins you can make.
Prerequisites
Before you start, make sure you have the following:
- A working Proxmox VE installation (Proxmox VE 7 or 8) with at least one virtual machine already created
- Access to the Proxmox web interface, usually at
https://your-server-ip:8006 - Either console/SSH access to the Proxmox host, or the ability to use the built-in web console (Shell) for your VMs
- A basic Linux VM (Debian, Ubuntu, or a RHEL-based distribution) or a Windows VM to practice on
- Root or sudo access inside the guest operating system
You don't need any prior virtualization experience. If you know how to open a terminal and copy-paste a command, you're ready.
Step-by-Step Tutorial
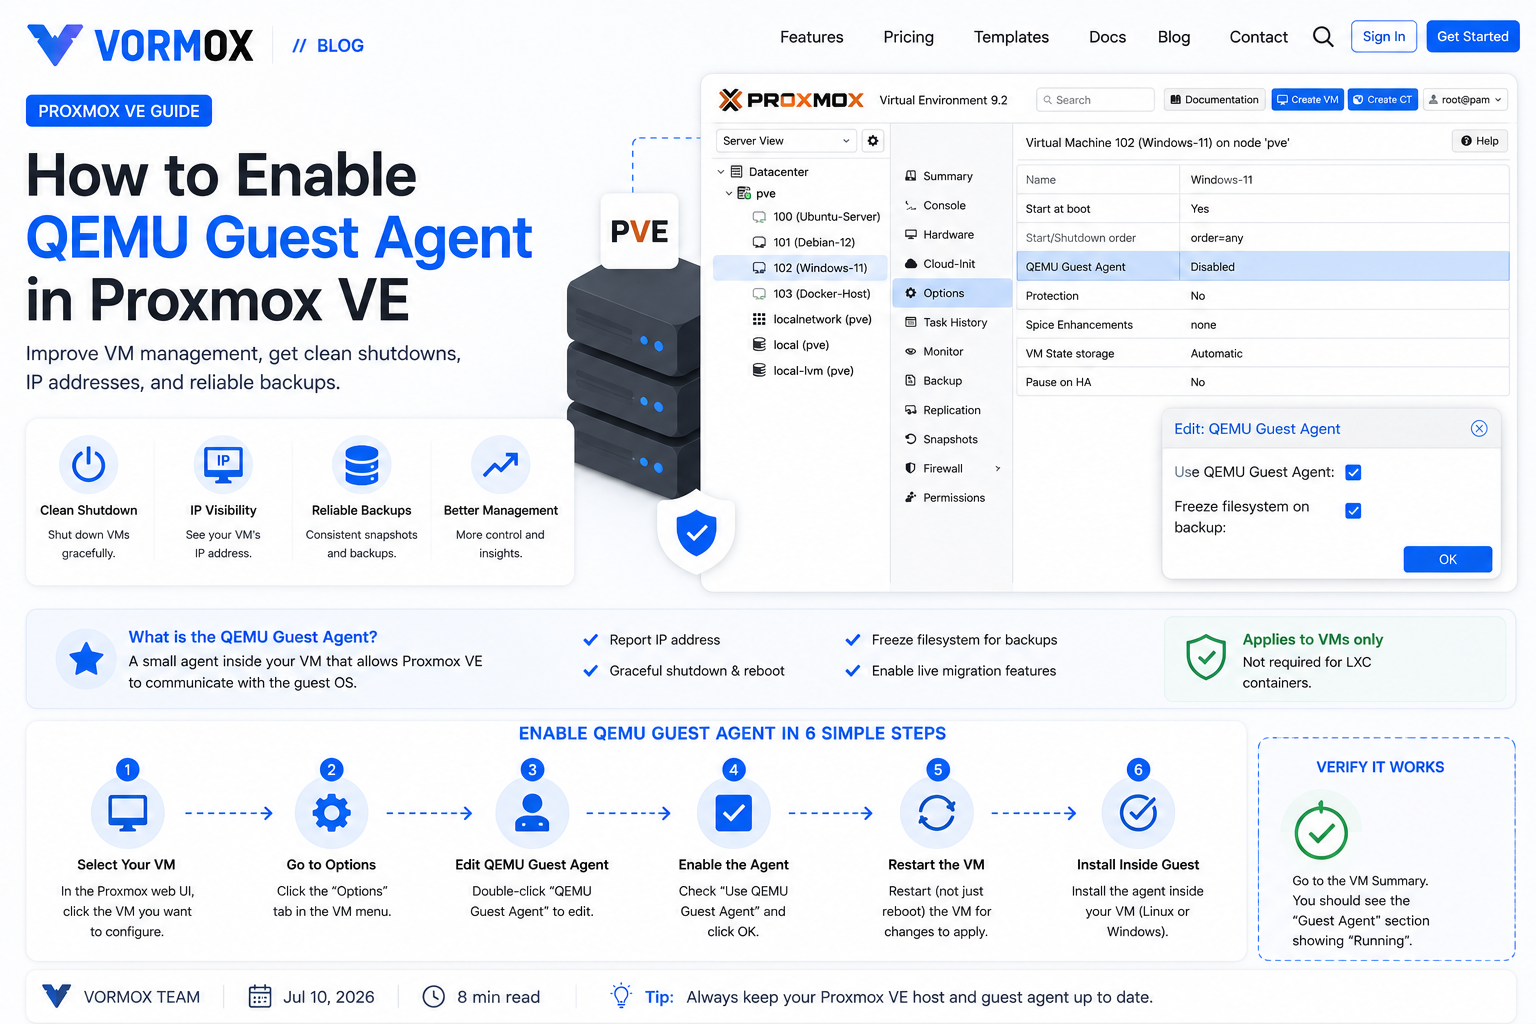
Step 1: Enable the Guest Agent Option on the VM
The Guest Agent has two halves: a setting on the Proxmox side that says "expect this VM to have an agent," and the actual agent software running inside the VM. Let's start with the Proxmox side.
- Log in to the Proxmox web interface.
- In the left-hand tree, click on the virtual machine you want to configure.
- Click Options.
- Find the row named QEMU Guest Agent and double-click it (or select it and click Edit).
- Check the box labeled Use QEMU Guest Agent, then click OK.
If you'd rather use the command line, you can do the same thing from the Proxmox host's shell:
qm set 101 --agent enabled=1Replace 101 with your VM's actual ID number, which you can see next to its name in the Proxmox interface.
This setting only tells Proxmox to expect an agent. It does not install anything inside the VM. If the VM is already running, you will need to restart it (a reboot, not just enabling the option, is required for the change to take effect).
Step 2: Install the Guest Agent Inside a Linux VM
Open a terminal inside the VM itself — either through SSH or the Proxmox web console — and run the commands for your distribution.
Debian or Ubuntu:
sudo apt update
sudo apt install qemu-guest-agent -y
RHEL, Rocky Linux, AlmaLinux, or Fedora:
sudo yum install qemu-guest-agent -yOnce installed, start the service and set it to launch automatically at boot:
sudo systemctl enable --now qemu-guest-agentThat single command does two things at once: enable makes sure the service starts automatically every time the VM boots, and --now also starts it immediately, so you don't have to reboot to test it.
Step 3: Install the Guest Agent Inside a Windows VM
Windows doesn't ship with the Guest Agent built in, so you need to bring in the VirtIO driver package first.
- Download the latest virtio-win ISO from the official Fedora VirtIO drivers project.
- In the Proxmox web interface, select your Windows VM, go to Hardware, and add the ISO as a second CD/DVD drive (or upload it to your ISO storage first, then attach it).
- Start the VM and open File Explorer inside Windows.
- Open the mounted VirtIO drive and run
virtio-win-guest-tools.exe. This installer bundles the VirtIO drivers and the QEMU Guest Agent together, so you don't need to hunt for separate files. - Follow the installation prompts and let it finish.
After installation, the agent should already be running as a Windows service called QEMU Guest Agent. You can confirm this by opening PowerShell and running:
Get-Service QEMU-GAThe Status column should show Running. If it shows Stopped, right-click the service in the Windows Services app and choose Start.
Step 4: Restart the VM
Since enabling the Guest Agent option in Step 1 changes how the VM's virtual hardware is presented, a full reboot (not just installing software) makes sure the VirtIO serial channel is properly set up. From the Proxmox web interface, select the VM and click Reboot in the top-right toolbar, or run:
qm reboot 101Step 5: Verify the Agent Is Working
Back on the Proxmox host, run:
qm agent 101 pingIf everything is set up correctly, this command returns silently with no output and no error. If you get an error instead, jump ahead to the Troubleshooting section below.
You can also check the VM's Summary tab in the Proxmox web interface. Within a minute or so of booting, the IPs field should populate with the VM's actual network addresses, pulled live from the guest operating system.
Commands Explained
| Command | What It Does |
|---|---|
qm set 101 --agent enabled=1 | Tells Proxmox that VM 101 should expect a Guest Agent, enabling the communication channel for it |
apt install qemu-guest-agent | Installs the Guest Agent package on Debian- and Ubuntu-based Linux distributions |
yum install qemu-guest-agent | Installs the Guest Agent package on RHEL-based Linux distributions such as Rocky Linux or AlmaLinux |
systemctl enable --now qemu-guest-agent | Starts the Guest Agent service immediately and configures it to start automatically on every future boot |
qm reboot 101 | Performs a full restart of VM 101 from the Proxmox host, refreshing its virtual hardware configuration |
qm agent 101 ping | Sends a test request to the Guest Agent inside VM 101 to confirm it is reachable and responding |
Get-Service QEMU-GA | A Windows PowerShell command that checks whether the QEMU Guest Agent Windows service is currently running |
Common Errors
Here are the messages you're most likely to run into, and what they actually mean.
- "QEMU guest agent is not running" — This appears when you try to use a feature that depends on the agent (like a filesystem-consistent backup or fetching the IP address), but Proxmox can't reach it. Usually this means the agent isn't installed yet, isn't started, or the VM hasn't been rebooted since you enabled the option.
- Command "qm agent" times out or hangs — This typically means the Guest Agent option is enabled in Proxmox, but no agent software is actually installed and listening inside the guest OS.
- No IP address shown on the Summary tab — Either the agent isn't installed/running yet, or the VM hasn't finished booting. Give it a minute after startup before assuming something is wrong.
- Windows service shows "Stopped" after installation — Occasionally the Windows installer doesn't set the service to auto-start. Set its startup type to Automatic in the Services app and start it manually once.
Troubleshooting
If qm agent <vmid> ping isn't working, work through these checks in order:
- Confirm the option is enabled. Go to VM > Options > QEMU Guest Agent and make sure the checkbox is ticked.
- Confirm you rebooted after enabling it. Enabling the option while the VM is already running does not add the required virtual serial device retroactively — a full stop/start or reboot is needed.
- Confirm the package is actually installed inside the guest. On Linux, run
systemctl status qemu-guest-agentto check whether the service exists and is active. On Windows, check the Services app for "QEMU Guest Agent." - Check the guest's system logs. On Linux,
journalctl -u qemu-guest-agentwill show if the service is crashing or failing to find its communication device. - Make sure you're using a VirtIO-based machine type. Very old VMs migrated from other hypervisors sometimes use a different, non-VirtIO machine configuration that doesn't expose the required serial channel. Check VM > Hardware > Machine, and consider recreating the VM with default (VirtIO) settings if this applies to you.
Best Practices
- Enable the Guest Agent on every new VM you create, right from the start, rather than adding it later — it costs nothing and saves you a reboot down the line.
- Always reboot the VM after toggling the Guest Agent option; don't assume it applies live.
- On Linux, use
systemctl enable --nowinstead of justsystemctl start, so the agent survives a future reboot without you having to remember to start it again. - When using Proxmox's built-in backup tool, keep the Guest Agent installed so backups can request a filesystem freeze, resulting in more consistent, reliable restores.
- Keep the VirtIO driver package on Windows VMs up to date, since newer versions often include performance and stability improvements alongside the Guest Agent itself.
Frequently Asked Questions
Does the Guest Agent slow down my VM?
No. It's a lightweight background process that uses a negligible amount of CPU and memory. You won't notice any performance impact from running it.
Is the Guest Agent required to run a VM in Proxmox?
No, it's optional. Your VM will boot and run fine without it. You'll just lose the extra visibility and safer backup/shutdown behavior described in this guide.
I enabled the option but didn't install anything inside the VM. What happens?
Proxmox will simply be unable to reach the agent and will show errors or time out when a feature tries to use it, such as fetching the IP address or requesting a filesystem freeze during backup. Nothing breaks — you just don't get the benefits until you install the agent inside the guest.
Can I use the Guest Agent on an LXC container?
No. LXC containers share the host's Linux kernel directly instead of running a separate virtualized operating system, so there is no separate guest kernel for an agent to run inside of. Containers don't need it, since Proxmox can already see everything about them directly from the host.
Does this work the same way on Proxmox VE 7 and Proxmox VE 8?
Yes. The Guest Agent workflow described in this guide — enabling the option, installing the package, and rebooting — has been consistent across recent Proxmox VE releases.
Conclusion
The QEMU Guest Agent is one of those small details that's easy to skip when you're just getting started with Proxmox, but it quietly makes everything else more reliable — from seeing your VM's real IP address to getting clean, consistent backups. The whole setup takes only a few minutes: flip on the option in Proxmox, install one package inside your VM, and reboot.
Now that you've got it running, a good next step is to set up your first automated backup schedule so you can see the Guest Agent's filesystem-freeze feature working for you in practice.