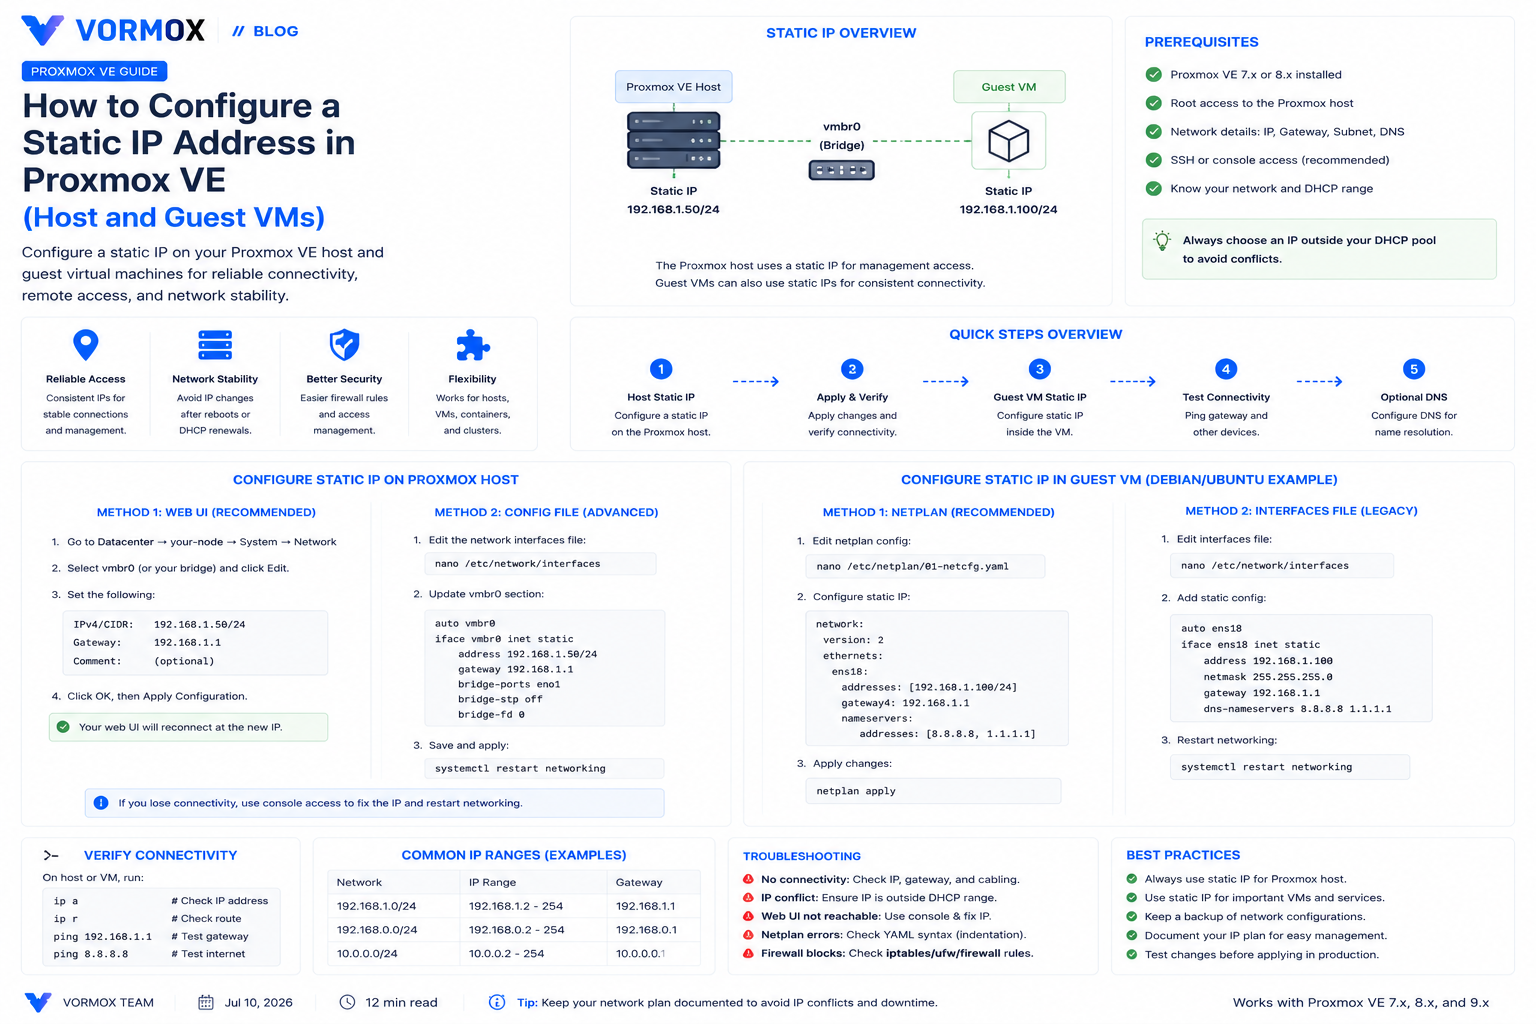
You've spun up a VM in Proxmox, everything boots fine, and then you notice something odd — the IP address you set inside the guest OS doesn't survive a reboot, or worse, you cloned a template and now three VMs are fighting over the same address. A static IP fixes that, but the "how" changes depending on whether you're setting it on the Proxmox host itself or inside a guest VM, and mixing those up is where most beginners get stuck.
This guide covers both cases, with real file paths and real command output, so you know exactly what you're looking at when you open a terminal.
What You Will Learn
- The difference between setting a static IP on the Proxmox host versus inside a virtual machine
- How to configure a static IP on the Proxmox host using the web interface
- How to edit
/etc/network/interfacesdirectly when you need more control - How to set a static IP inside a Debian or Ubuntu guest VM using Netplan
- How Cloud-Init can assign a static IP automatically when a VM is cloned
- What to check when a static IP change locks you out of the web interface
What Is This Feature?
A static IP address is one that never changes — you set it once, and the machine keeps that address every time it boots, instead of asking a DHCP server for a new one. DHCP (the thing your router usually does automatically) is convenient, but it can hand out a different address after a lease expires or a reboot, which is a problem if you're trying to SSH into the same server every day or point other services at a fixed address.
In Proxmox, "setting a static IP" can mean two different things depending on what you're configuring:
- The Proxmox host itself — the physical (or virtual) machine running Proxmox VE. This is the address you type into your browser to reach the web interface at
https://your-ip:8006. - A guest VM or container — a virtual machine running inside Proxmox, which has its own separate network configuration entirely independent of the host's.
These are configured in completely different places, and it's a common mix-up for people new to Proxmox to edit the wrong one and wonder why nothing changed.
Why Would You Use It?
For the Proxmox host, a static IP is close to mandatory. If your host's address changes, you lose access to the web UI at whatever bookmark you saved, and if you're running a cluster, a changed IP can break communication between nodes entirely. This isn't a "nice to have" — plan on setting this during your very first install.
For guest VMs, it depends on the role. A VM running a web server, a Pi-hole instance, Home Assistant, or anything else you connect to by address should have a static IP. A short-lived test VM you'll delete in an hour doesn't need one — DHCP is fine there, and it saves you a step.
I'd also add: if you're using Cloud-Init to deploy VMs from a template (common once you've got more than a couple of VMs), setting the IP through Cloud-Init at clone time is far less error-prone than logging into each VM individually afterward.
Prerequisites
- A Proxmox VE 7.x or 8.x host with the default network bridge (usually
vmbr0) already configured - Root SSH access to the Proxmox host, or console access through the web UI as a fallback
- Know the IP range your router or network uses, so you pick an address outside your DHCP pool (check your router's DHCP settings — most routers hand out from a range like 192.168.1.100–200, leaving lower addresses free)
- Your subnet mask (almost always
/24for home networks) and your router's IP, which will be your gateway
A quick warning before you start: if you're connected over SSH or the web UI and you get the address wrong, you can lock yourself out. Always have physical or console access as a backup before touching network settings on the host.
Step-by-Step Tutorial
Step 1: Set a Static IP on the Proxmox Host (Web UI Method)
Log into the Proxmox web interface, click on your node name in the left tree, then go to System → Network.
Select vmbr0 (or whatever bridge carries your host's main connection) and click Edit. You'll see fields for IPv4/CIDR, Gateway, and so on.
- IPv4/CIDR — enter your chosen address with the subnet, like
192.168.1.50/24 - Gateway — your router's address, usually something like
192.168.1.1
Click OK, then click Apply Configuration at the top of the Network panel. This is the step people forget — editing the bridge alone doesn't apply anything until you click Apply.
Step 2: Set a Static IP on the Host (Config File Method)
If you'd rather edit the config directly, or the web UI locked you out and you need console access to fix it, open the interfaces file:
nano /etc/network/interfacesYou'll see a block for vmbr0 that looks something like this:
auto vmbr0
iface vmbr0 inet static
    address 192.168.1.50/24
    gateway 192.168.1.1
    bridge-ports eno1
    bridge-stp off
    bridge-fd 0
Adjust the address and gateway lines to match your network, save the file, and apply the change without a full reboot:
systemctl restart networkingOn some Proxmox 8.x installs using the newer ifupdown2 package, that command applies cleanly with no dropped connection. On older setups it can briefly interrupt your SSH session — that's expected, just reconnect using the new address.
Step 3: Set a Static IP Inside a Debian or Ubuntu Guest VM
Modern Debian and Ubuntu installs use Netplan for network configuration instead of the old interfaces file. Find your config file:
ls /etc/netplan/You'll typically see one file, something like 01-netcfg.yaml or 50-cloud-init.yaml. Open it:
sudo nano /etc/netplan/01-netcfg.yamlEdit it to look like this, matching your VM's network interface name (check with ip a if you're not sure — it's often ens18 on Proxmox VMs using the VirtIO network adapter):
network:
  version: 2
  ethernets:
    ens18:
      dhcp4: no
      addresses:
        - 192.168.1.60/24
      routes:
        - to: default
          via: 192.168.1.1
      nameservers:
        addresses: [1.1.1.1, 8.8.8.8]
Apply the change:
sudo netplan applyYAML is picky about indentation — it uses spaces, not tabs, and every level needs to line up exactly. If netplan apply throws an error, that's almost always the cause.
Step 4: Assign a Static IP Through Cloud-Init (Optional but Worth Knowing)
Cloud-init is a tool that configures a VM automatically the first time it boots — things like the hostname, SSH keys, and network settings — which is especially useful when you're cloning the same template repeatedly and don't want to log in and configure each clone by hand.
If your VM template has a Cloud-Init drive attached, select the VM in Proxmox, click Cloud-Init in the left panel, and set the IPv4 field to Static. Fill in the IP/CIDR and gateway, then click the Regenerate Image button that appears at the top. Start (or restart) the VM, and it'll boot with that address already configured — no manual editing inside the guest at all.
Commands Explained
| Command | What It Does |
|---|---|
nano /etc/network/interfaces | Opens the Proxmox host's network config file for direct editing. |
systemctl restart networking | Reapplies the host's network configuration without a full reboot. |
ip a | Lists all network interfaces and their current IP addresses — the fastest way to check what changed. |
sudo nano /etc/netplan/*.yaml | Opens the Netplan config file inside a Debian or Ubuntu guest VM. |
sudo netplan apply | Applies changes made in a Netplan YAML file immediately, without needing a reboot. |
ping 1.1.1.1 | A quick way to confirm the gateway and internet route are working after a network change. |
Common Errors
Cannot assign requested address
This usually means the IP you entered isn't valid for the subnet mask you specified, or there's a typo in the CIDR notation — double-check you wrote /24 and not something like /32, which only allows a single address with no room for a gateway.
Failed to apply changes: interfaces file has been changed on disk
This shows up when you edit /etc/network/interfaces directly while the Proxmox web UI still has the older version loaded. Refresh the Network panel in the browser, or just log in again — no data is lost, it's just a stale-cache warning.
Invalid YAML / netplan apply errors
Almost always an indentation problem. Netplan config is YAML, and mixing tabs and spaces, or misaligning a nested key, breaks the whole file. Run sudo netplan try first — it validates the config and rolls back automatically after 120 seconds if something's wrong, which is a much safer way to test than apply.
Troubleshooting
If you apply a new static IP to the Proxmox host and the web UI stops responding, don't panic — this is recoverable almost every time. Connect a monitor and keyboard directly to the server, or use its IPMI/iKVM if it has one, and log in at the console. From there, run ip a to confirm the actual current address, and compare it against what you typed into /etc/network/interfaces. A mismatched subnet or a missing gateway line is the most common cause.
For guest VMs, if netplan apply succeeds but the VM still can't reach the internet, check that the gateway address is actually correct and that the VM's virtual network adapter is attached to the right bridge in Proxmox's Hardware tab — it's easy to build a VM on vmbr1 by accident if you have more than one bridge configured.
If a cloned VM keeps getting a DHCP address instead of the static one you set through Cloud-Init, make sure you clicked Regenerate Image after changing the Cloud-Init settings. Without that step, the old cloud-init disk image is still attached and the new settings never get baked in.
Best Practices
- Pick static addresses from outside your router's DHCP range to avoid two devices fighting over the same IP later.
- Keep a simple spreadsheet or note of which IP belongs to which VM once you're past four or five machines — it's easy to lose track otherwise.
- Always test network changes on the host with a console session open as a fallback, not just an SSH session that could drop.
- Use Cloud-Init for any VM you plan to clone more than once — it saves far more time than it costs to set up initially.
- Set your Proxmox host's IP before joining it to a cluster. Changing a node's IP after clustering is possible but genuinely painful, and it's much easier to get it right the first time.
Frequently Asked Questions
Do I need a static IP on the Proxmox host?
Yes, essentially always. A changing host IP breaks your web UI bookmark and, in a cluster, can break communication between nodes.
What's the difference between setting the IP on the host versus inside a VM?
The host's IP controls access to the Proxmox web interface itself. A VM's IP is completely separate and only affects that individual virtual machine's network access.
Can I use a static IP with DHCP reservations instead?
Yes — setting a DHCP reservation on your router achieves a similar result without touching the Proxmox or guest OS configuration at all. It's a solid alternative if you'd rather manage addresses from one place.
Why did netplan apply lock me out of my SSH session?
If you change the IP address of the interface you're connected through, your SSH session drops the moment the new address takes effect. Reconnect using the new IP — the VM itself is fine.
Does Cloud-Init work on templates I didn't create myself?
Only if the template has a Cloud-Init drive attached and the guest OS image was built with cloud-init installed. Most official cloud images for Ubuntu and Debian include it by default.
Conclusion
Static IPs aren't complicated once you know which layer you're configuring — host or guest — and the commands themselves are only a few lines. The part that actually matters is discipline: pick addresses outside your DHCP range, keep a record of what's assigned where, and always have a fallback console session open before you touch the Proxmox host's own network settings.
Get that right once, and you'll rarely think about it again.