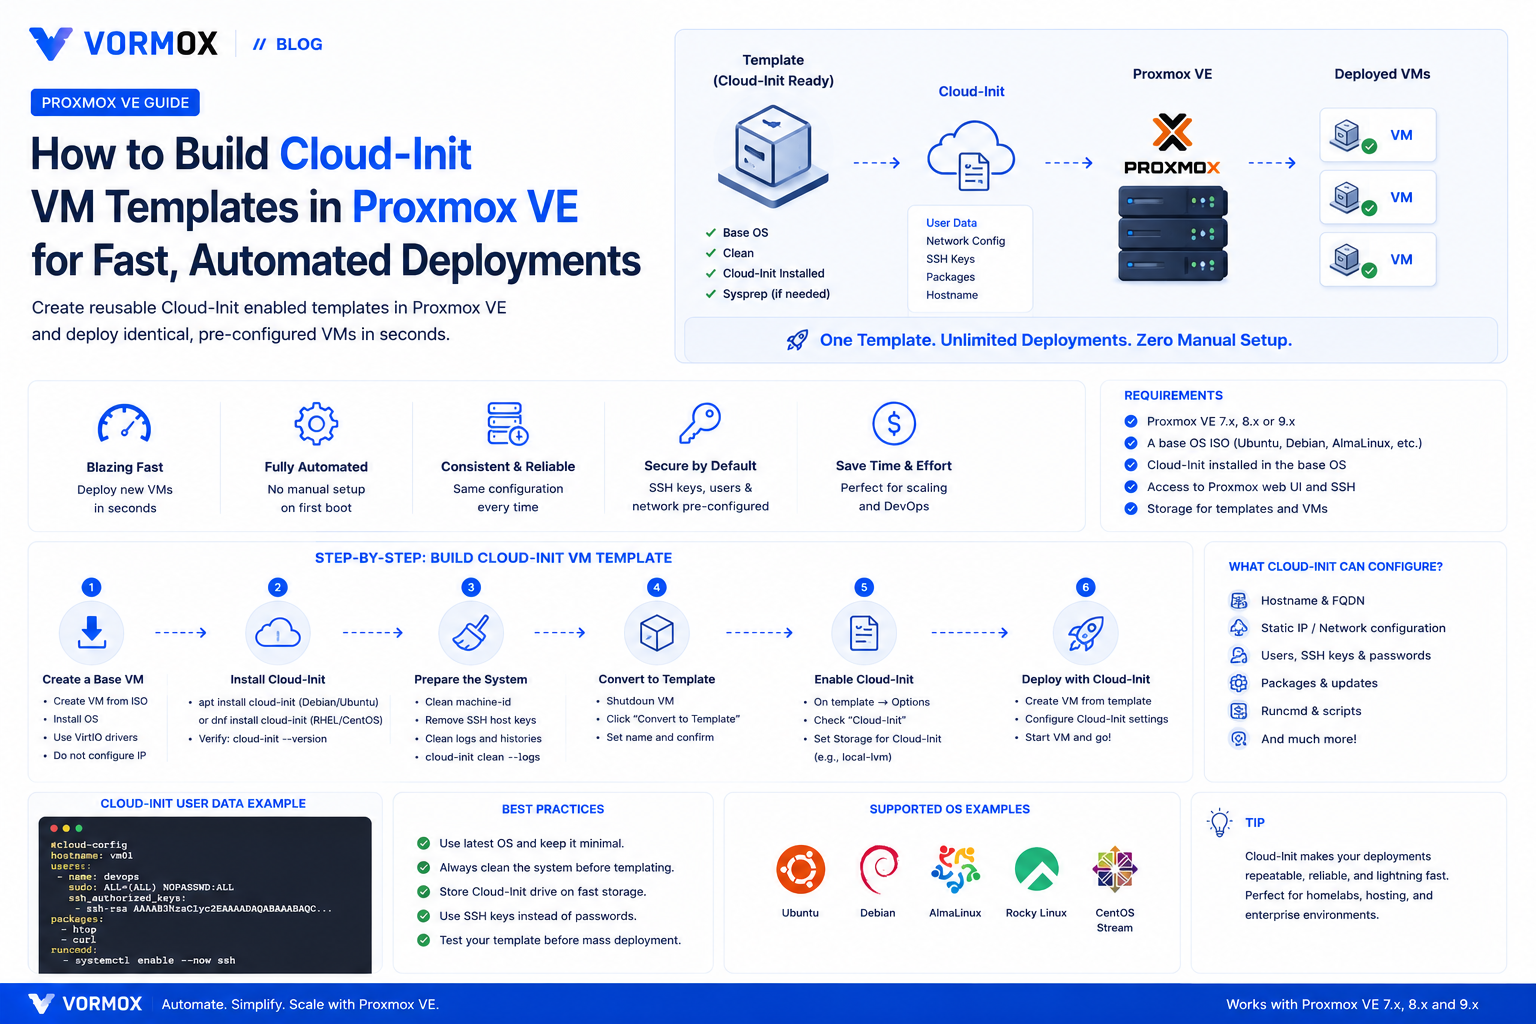
Manually installing a guest operating system through the Proxmox VE console every time you need a new virtual machine works fine for a handful of VMs. It stops working the moment you need ten identical Ubuntu web servers, a fresh test environment every week, or a lab you can tear down and rebuild in minutes. The fix built into Proxmox VE is the combination of cloud images and cloud-init: instead of running an interactive installer, you import a pre-built, minimal OS disk image and let cloud-init configure the hostname, network, users, and SSH keys automatically on first boot.
This guide walks through building a proper cloud-init VM template in Proxmox VE 9.x from scratch, converting it into a reusable template, and cloning it into fully configured VMs in seconds. It also covers the custom cloud-init snippets workflow for cases where the built-in fields aren't enough, and the troubleshooting steps for the handful of things that reliably trip people up the first time.
What Cloud-Init Actually Does
Cloud-init is a boot-time provisioning tool that ships pre-installed in almost every official cloud image (Ubuntu, Debian, Rocky Linux, AlmaLinux, Fedora, and others all publish "cloud" or "generic cloud" images built for this purpose). When such an image boots for the first time, cloud-init looks for a small data source — in Proxmox's case, a virtual CD-ROM or disk containing user-data, meta-data, and network-config files — and uses it to:
- Set the hostname and machine ID
- Create or configure the default user account
- Inject SSH public keys
- Apply static IP configuration or request DHCP
- Resize the root filesystem to fill the disk
- Run arbitrary bootstrap commands or write files, if you supply custom user-data
Proxmox VE has first-class support for this. It generates the cloud-init data source automatically from VM configuration options (ciuser, sshkeys, ipconfig0, and so on), or you can override it entirely with your own YAML via storage snippets. Once a VM is set up this way and converted into a template, every clone of it boots as a distinct, correctly configured machine with zero manual steps.
Prerequisites
- A working Proxmox VE 8.x or 9.x host with at least one storage that supports both disk images and, if you plan to use custom snippets, the "Snippets" content type (only certain storage types — directory-based storage like
local, NFS, or CIFS — support snippets; block storage like LVM-thin or Ceph RBD does not). - Shell access to the Proxmox host, either directly or through the web UI's Shell option on the node.
- An SSH key pair on the machine you'll be connecting from (
ssh-keygen -t ed25519if you don't already have one). - Enough free space in your target storage for the cloud image (typically 2-3 GB per template before resizing).
Step 1: Download a Cloud Image
Cloud images are published by every major distribution specifically for this use case. They are minimal, cloud-init-enabled, and use qcow2 or raw disk formats. Log in to your Proxmox node's shell and download one. A few common sources:
# Ubuntu 24.04 LTS (Noble Numbat)
wget https://cloud-images.ubuntu.com/noble/current/noble-server-cloudimg-amd64.img

# Debian 13 (Trixie)
wget https://cloud.debian.org/images/cloud/trixie/latest/debian-13-generic-amd64.qcow2

# Rocky Linux 9
wget https://dl.rockylinux.org/pub/rocky/9/images/x86_64/Rocky-9-GenericCloud.latest.x86_64.qcow2
Pick the distribution and release that matches what you actually deploy in production — there's little point templating an OS you don't run. This guide uses the Ubuntu 24.04 image as the running example; the commands are identical for the others aside from the filename.
Step 2: Create the Base VM Shell
Pick a VM ID that's clearly outside your normal range so templates are easy to spot — 9000 and up is a common convention. Create an empty VM with no disk yet:
qm create 9000 \
  --name "ubuntu-24.04-cloudinit-template" \
  --memory 2048 \
  --cores 2 \
  --net0 virtio,bridge=vmbr0 \
  --scsihw virtio-scsi-pci \
  --ostype l26
The memory and core count here only matter for the template's default — every VM you clone from it can have these overridden individually afterward, so don't overthink the sizing at this stage.
Step 3: Import the Cloud Image as the Boot Disk
Rather than manually converting the image and moving it into place, use qm set with import-from, which handles format conversion and storage allocation for you:
qm set 9000 --scsi0 local-lvm:0,import-from=/root/noble-server-cloudimg-amd64.img
Replace local-lvm with whatever storage you're targeting. On older Proxmox VE releases you may instead see this done as a two-step process with qm importdisk followed by qm set --scsi0 — both approaches produce the same result; the single-command import-from syntax is the current recommended method.
Step 4: Attach the Cloud-Init Drive
This is the piece that actually delivers configuration data to the guest at boot. It's a small virtual CD-ROM device, not part of your OS disk:
qm set 9000 --ide2 local-lvm:cloudinit
Proxmox VE populates this drive automatically based on the cloud-init options you set on the VM (covered in Step 6) or from custom snippet files if you provide them.
Step 5: Fix the Boot Order and Console
Cloud images generally don't ship a graphical console by default, and Proxmox will otherwise waste time checking the CD-ROM for a bootable OS on every boot. Set the disk as the sole boot device and enable a serial console so you can view boot output from the Proxmox UI:
qm set 9000 --boot order=scsi0
qm set 9000 --serial0 socket --vga serial0
Step 6: Configure Cloud-Init Defaults
These are the values Proxmox bakes into the generated user-data and network-config for the guest. Set a default user, inject your SSH public key, and configure DNS:
qm set 9000 --ciuser azureuser
qm set 9000 --sshkeys ~/.ssh/id_ed25519.pub
qm set 9000 --nameserver 1.1.1.1 --searchdomain lan.local
For networking, decide whether clones should default to DHCP or a static address. Since this is a template, DHCP is usually the sane default — you override ipconfig0 per clone later:
qm set 9000 --ipconfig0 ip=dhcp
Avoid setting cipassword on a template. Password-based cloud-init auth is disabled for SSH by default and baking a static password into every clone is a bad habit — key-based auth via sshkeys is the correct approach for anything beyond a quick lab.
Step 7 (Optional): Custom Cloud-Init Snippets for Advanced Config
The built-in ciuser/sshkeys/ipconfig fields cover the common case, but sometimes you need more — installing packages on first boot, writing config files, joining a domain, running a bootstrap script. For that, Proxmox lets you supply your own cloud-init user-data, meta-data, and network-config as YAML files stored on a snippets-capable storage.
First, make sure a storage has the Snippets content type enabled — in the UI, go to Datacenter → Storage, edit the storage (only directory-type storages like local qualify), and tick Snippets under Content. From the CLI, place your file directly:
mkdir -p /var/lib/vz/snippets
cat > /var/lib/vz/snippets/userconfig.yaml <<'EOF'
#cloud-config
package_update: true
packages:
  - qemu-guest-agent
  - fail2ban
runcmd:
  - systemctl enable --now qemu-guest-agent
EOF
Then point the VM at it:
qm set 9000 --cicustom "user=local:snippets/userconfig.yaml"
You can mix and match — supply a custom user= file while still letting Proxmox generate network= and meta= automatically from the VM's ipconfig0 settings, or override all three independently with network=local:snippets/network.yaml,meta=local:snippets/meta.yaml. To sanity-check exactly what Proxmox is going to hand the guest before you boot it, dump the generated config:
qm cloudinit dump 9000 user
qm cloudinit dump 9000 network
This is worth doing once before you convert to a template — it catches malformed YAML and typos before they get baked into every clone.
Step 8: Enable the QEMU Guest Agent
If you didn't already install it via a snippet above, install qemu-guest-agent inside the image before templating and enable the agent flag on the VM config so Proxmox can report the guest's actual IP address, coordinate clean shutdowns, and support consistent snapshots:
qm set 9000 --agent enabled=1
You can install the package by briefly starting the VM, letting cloud-init run once, SSHing in, running apt install -y qemu-guest-agent && systemctl enable --now qemu-guest-agent, then shutting it back down before continuing — or bake it in via the snippet from Step 7, which is cleaner since it avoids a throwaway boot cycle touching the template's cloud-init state.
Step 9: Size the Disk Correctly
Cloud images ship intentionally small — often 2 GB or less — because cloud-init automatically grows the root filesystem to fill whatever disk it's given at boot. Decide how large you want clones' root disks to be by default and resize the template's disk now, before converting it to a template:
qm resize 9000 scsi0 +18G
This grows the underlying block device to 20 GB total (2 GB image + 18 GB added). The guest filesystem itself won't actually expand until cloud-init's growpart/resizefs modules run on a clone's first boot — which is the default behavior, so you don't need to do anything extra for that part.
Step 10: Convert the VM into a Template
With the disk, cloud-init drive, boot order, and cloud-init options all configured, convert the VM:
qm template 9000
This is a one-way operation for that VM ID — a template can no longer be booted directly, and its disk becomes a read-only base image that clones reference. If you need to change something afterward (a new package baked into the snippet, a newer kernel), the clean approach is to clone the template once, make changes on the clone, shut it down, then convert that clone into a new template with a new VM ID, rather than trying to un-template the original.
Step 11: Clone the Template into Real VMs
This is the payoff. Cloning from a template is dramatically faster than a fresh install, and you can do it as a full clone (independent disk, safe to migrate between nodes and storages) or a linked clone (shares the template's base disk, uses far less space, but ties the clone to the template's storage):
# Full clone
qm clone 9000 201 --name web-01 --full

# Linked clone
qm clone 9000 202 --name web-02
Then override the per-VM settings that should differ from the template defaults — hostname, IP, and anything else:
qm set 201 --ipconfig0 ip=10.0.10.51/24,gw=10.0.10.1
qm set 201 --name web-01
qm start 201
Boot it and within a few seconds cloud-init applies the hostname, network config, and SSH key, and the VM is reachable — no installer, no manual configuration, no waiting around in a console.
Automating Beyond the CLI
Once this workflow is solid, it's straightforward to drive it from outside Proxmox entirely. Terraform's bpg/proxmox or Telmate/proxmox providers can clone a template and set cloud-init options declaratively, and Packer's Proxmox builder can automate building the template image itself from a fresh cloud image on a schedule, so your golden image is rebuilt with current patches on a cadence instead of going stale. Both approaches build directly on top of the same template-and-clone mechanics described here — nothing about the underlying Proxmox behavior changes, only what's driving the API calls.
Troubleshooting
Clone boots but network config isn't applied
Most often this means the cloud image's networking is managed by netplan or NetworkManager in a way that conflicts with cloud-init's renderer, or the VM still has an old cloud-init cache from a previous boot. Check cloud-init status --long inside the guest, and inspect /var/log/cloud-init.log. If you cloned from a template that was itself booted and configured before being converted, its cloud-init instance ID may have been cached — Proxmox handles regenerating this correctly for clones in modern releases, but if you manually booted the source VM before templating, run cloud-init clean inside it beforehand so the next boot is treated as a genuinely new instance.
SSH key isn't injected
Confirm the key format — Proxmox expects standard OpenSSH public key format (the contents of id_ed25519.pub, not the private key or a converted format). Also confirm ciuser matches an account that actually exists in the image; on some distro cloud images the default user isn't root but a distro-specific account like ubuntu or debian, and setting ciuser to something else creates a new user rather than configuring the existing default one, which can be exactly what you want or exactly what trips you up depending on intent.
VM hangs at boot with no console output
This is almost always the missing serial console setting from Step 5. Cloud images typically route console output to a serial port, not the emulated VGA display Proxmox shows by default. Set --serial0 socket --vga serial0 and use the xterm.js console in the UI instead of the default noVNC console to see what's actually happening.
"cicustom" file changes aren't taking effect on existing clones
Cloud-init only runs its full first-boot sequence once per instance by design; a VM that's already booted and completed cloud-init won't re-run it just because you edit the snippet file and reboot. To force a full re-run on an already-provisioned guest for testing, run cloud-init clean --logs inside the guest and reboot. This is a debugging aid, not something to do on production VMs.
Snippets option is greyed out for a storage
Only directory-based storage types (local Directory storage, NFS, CIFS) support the Snippets content type in Proxmox VE. Block-based storage like LVM-thin, ZFS zvols, or Ceph RBD cannot store arbitrary files and will never show Snippets as an option — point cicustom at a different storage than the one holding your VM disks if needed; they don't have to match.
Disk didn't grow inside the guest after qm resize
Resizing with qm resize only grows the underlying virtual block device. The guest filesystem expansion is cloud-init's job via its growpart/resizefs modules, and it only runs on a genuinely new instance's first boot — not on a VM that's already completed cloud-init once. If you resize a template's disk after it's already been cloned and booted elsewhere, existing clones won't pick up the change; only new clones taken after the resize will start with the larger disk.
Frequently Asked Questions
Do I need a subscription to use cloud-init templates in Proxmox VE?
No. Cloud-init support is a core feature of Proxmox VE and works identically on the free, no-subscription repository as it does on the enterprise repository.
What's the difference between templating a cloud-init VM and just cloning a normal VM?
A regular clone duplicates whatever state the source VM was in, including its hostname, machine ID, and any existing SSH host keys — you're expected to manually change all of that afterward. A cloud-init template is specifically built so that each clone is treated as a brand-new instance: cloud-init regenerates the machine ID, host keys, hostname, and network config independently for every clone at first boot, which is what makes it safe to spin up many at once without collisions.
Can I use cloud-init templates for Windows guests?
Proxmox VE supports a Windows-oriented equivalent using Cloudbase-Init instead of Linux cloud-init, with citype set to configdrive2 (the default when ostype is a Windows version). The overall template-and-clone workflow is the same, but Cloudbase-Init needs to be installed and configured inside the Windows image first, and its config drive format differs slightly from the Linux NoCloud format — treat it as a related but separate workflow, not a drop-in.
Should I use full clones or linked clones for production VMs?
Linked clones are great for disposable environments — CI runners, test labs, anything you'll tear down soon — because they're nearly instant and use minimal extra storage. For anything long-lived or that needs to be migrated between nodes and storage backends independently, use full clones; a linked clone can't outlive its parent template, and deleting or moving the template breaks every linked clone that depends on it.
How do I update a template once it's been created?
Templates are read-only once converted. Clone the template, boot the clone, apply your updates (patches, new packages, config changes), shut it down, then run qm template on that clone's VM ID to turn it into a new template. Keep the old template around under a different ID until you've confirmed the new one works, then remove it.
Why does my clone come up with the wrong IP even though I set ipconfig0 on the template?
Per-VM overrides always take priority — if you clone a template and don't explicitly set ipconfig0 on the clone, it inherits whatever was set on the template (commonly DHCP, per the setup above). Set ipconfig0 explicitly on each clone right after cloning, before the first boot, if it needs a static address.
Conclusion
Cloud-init templates turn VM provisioning in Proxmox VE from a repetitive manual process into something closer to infrastructure-as-code. The setup takes maybe fifteen minutes the first time — download an image, wire up the disk and cloud-init drive, set your defaults, template it — and after that, every new VM is a single qm clone plus a couple of overrides away. Combined with custom snippets for anything more elaborate than user and network config, and optionally driven through Terraform or Packer for full automation, it's the same underlying mechanism whether you're spinning up one lab VM by hand or a fleet of them from a pipeline.